Synergos Dashboard UI
The interaction introduced in the previous few chapters are from within a Notebook or a Synergos script. Synergos also supports interaction via its Dashboard with GUI.
This section describes how to interact with Synergos from within its Dashboard.
Setting up
Depending on your Synergos configuration of choice, you can refer the Setting up section of the other guides as linked below:
- Running Synergos Basic locally
- Running Synergos Basic in distributed mode
- Running Synergos Cluster in distributed mode
Running Synergos Dashboard
On your computer, clone the Synergos Dashboard repository and checkout the latest branch with the following commands:
# clone repo
git clone https://github.com/aimakerspace/synergos_ui.git

# change directory
cd ./synergos_ui

# change branch
git checkout tags/v0.1.0
Next, run the UI with the following command:
docker-compose up --build
If you had previously built the images or run the same command above on the current version, you may omit the
--buildflag. The omission allows you to skip building the requisite images from scratch again.
Landing page
To access the Synergos Dashboard UI, go to
localhost:4000in your browser.
When you first launch Synergos Dashboard, you will be directed to the Landing page.
Click on the Synergos logo or text to enter the main page as shown below.
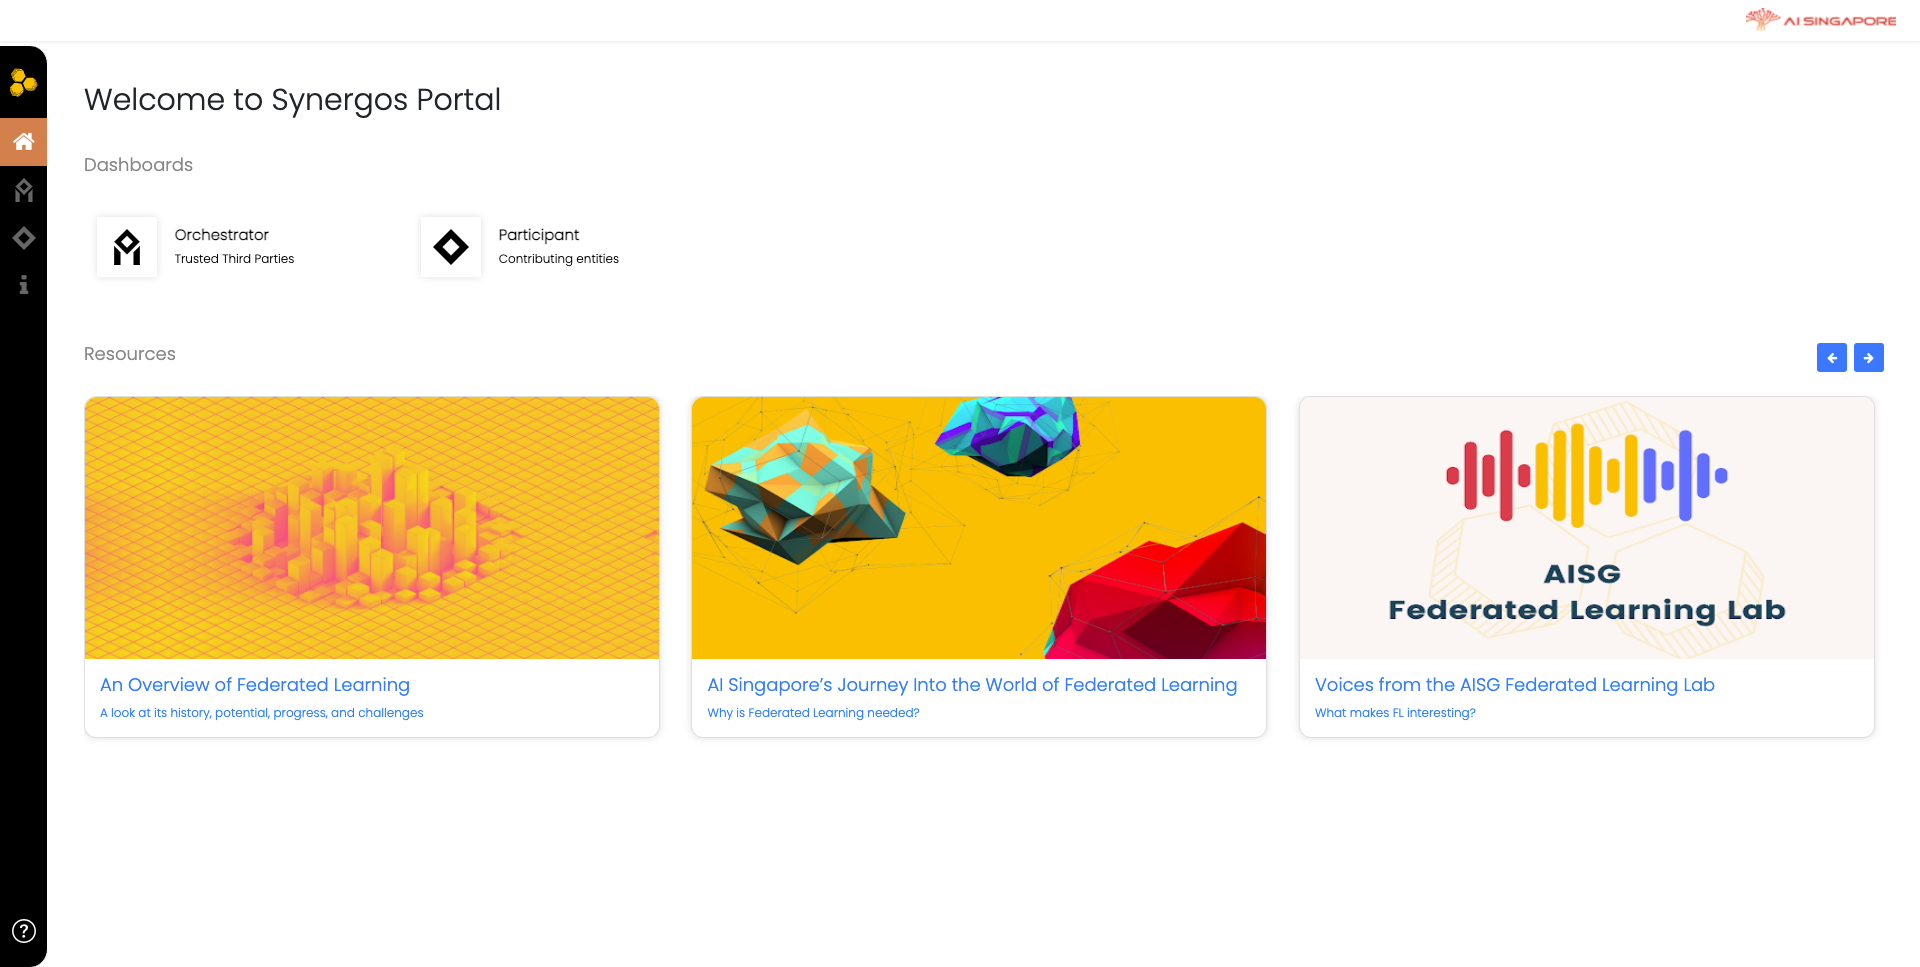
Depending on your role, click on Orchestrator or Participant, with each bringing you to their respective workflows.
Orchestrator workflow
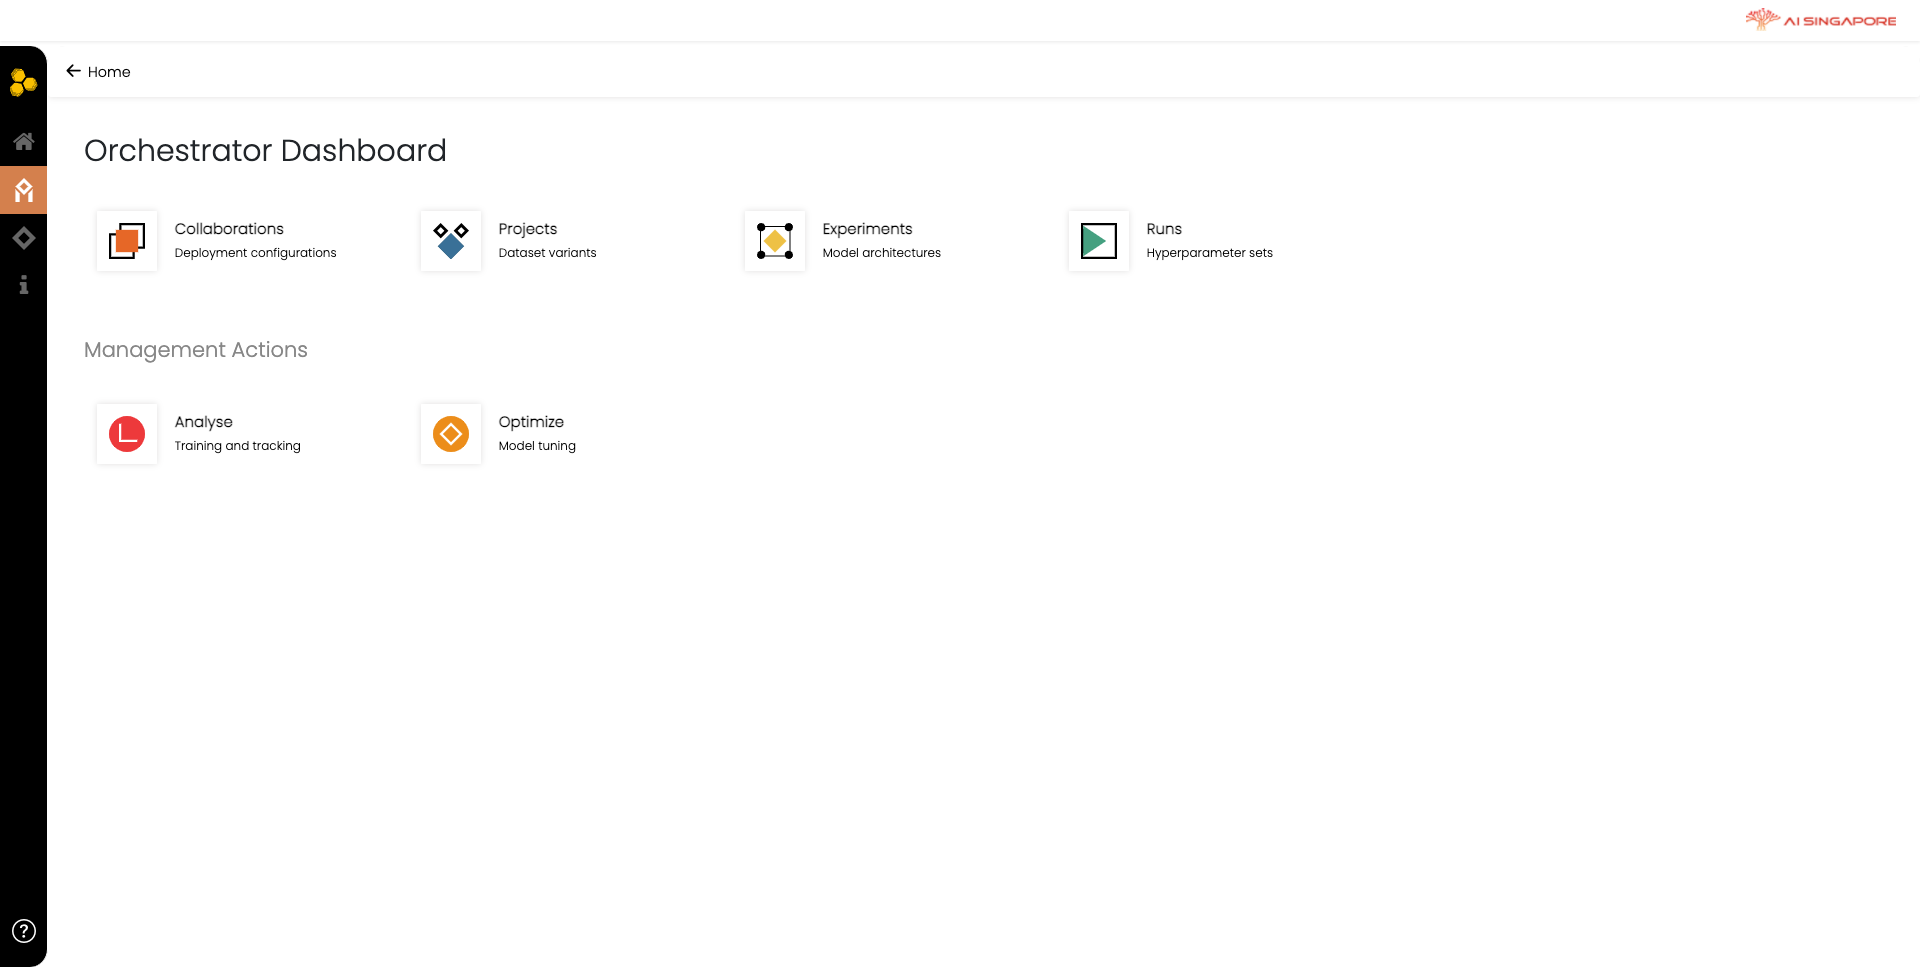
If you are the orchestrator, click on the Orchestrator button in the main page. This redirects you to the Orchestrator Dashboard, where you can define and trigger federated learning.
Phase 1: Registration
In this phase, you need to declare all required Synergos components and metadata (e.g., information about Collaboration, Project, Experiment, and Run).
1A. Orchestrator creates a collaboration
In the Orchestrator Dashboard, click on Collaborations. This will direct you to the Collaboration Actions page.
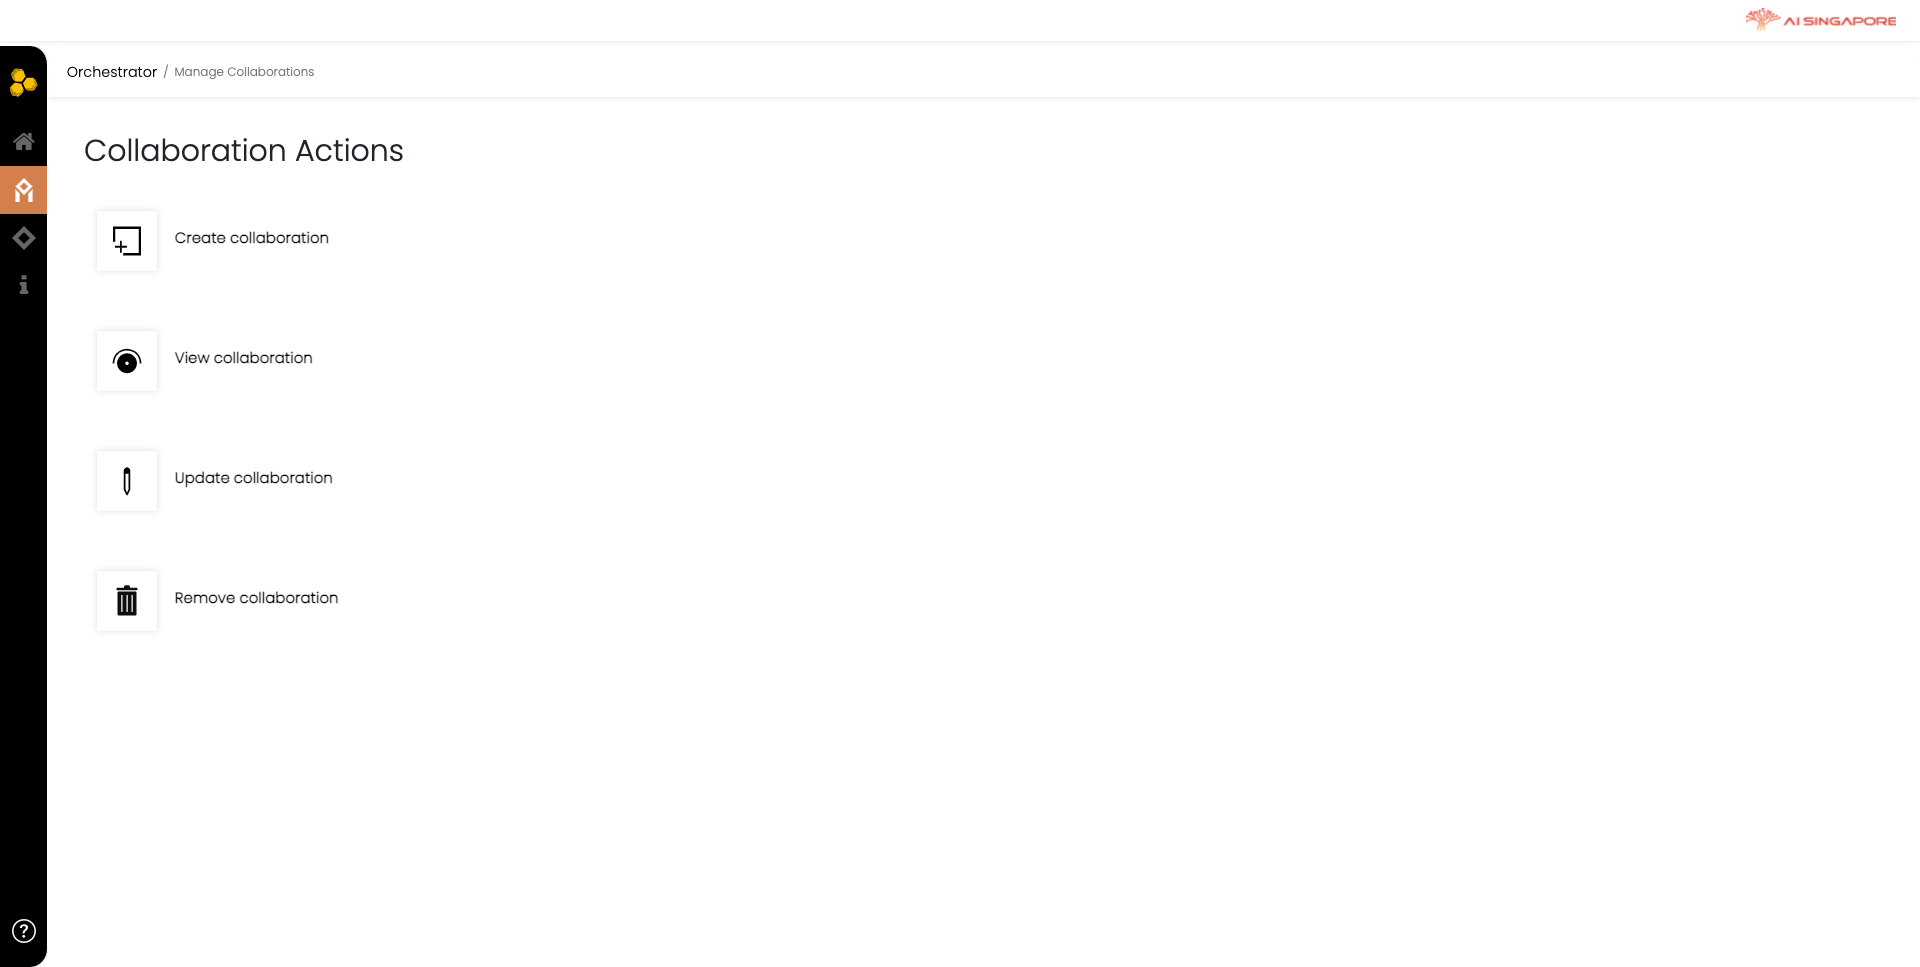
Click on the Create collaboration to start creating your collaboration. This directs you to the Manage Collaborations page. To create a new collaboration, select Create new collaboration(s) in the dropdown menu labeled What do you want to do? on the left panel. This will render the required fields and instructions in the main panel, as seen below.
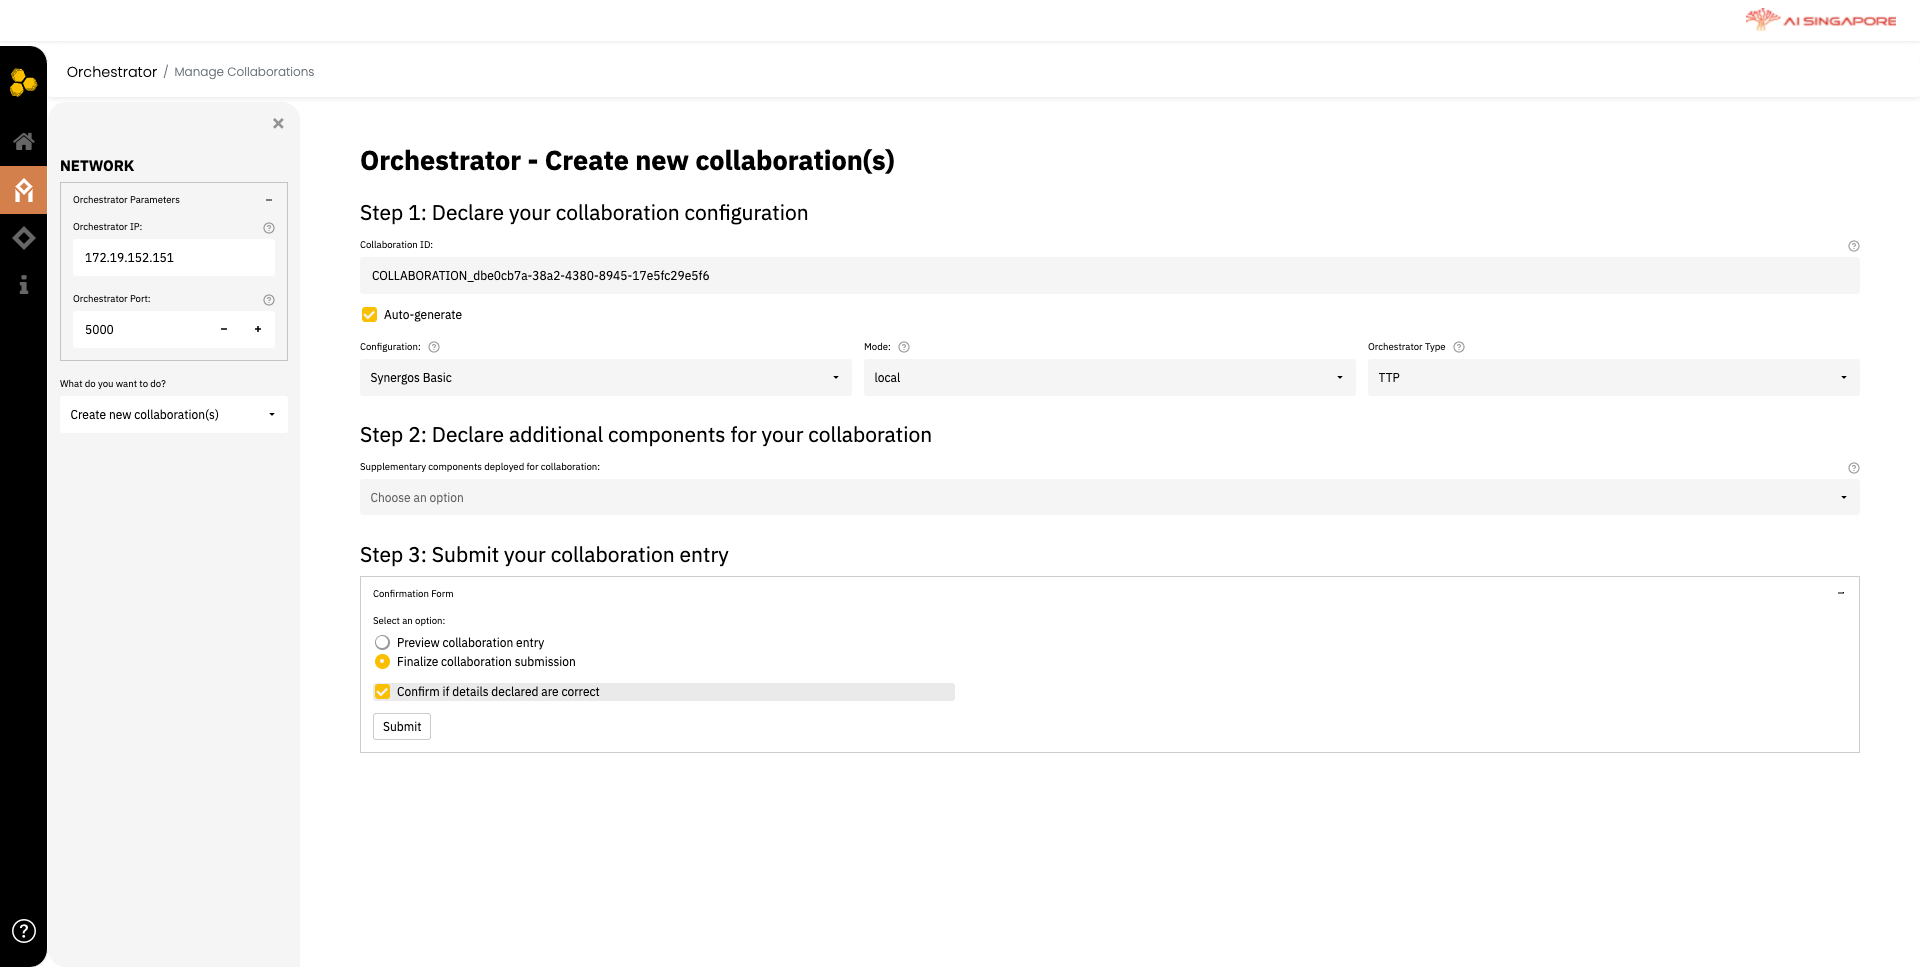
You can key in Collaboration ID manually or allow Synergos to Auto-generate.
In other guides, you have seen different configurations of Synergos, e.g., running Synergos basic Locally, Synergos basic in distributed mode or Synergos cluster in distributed mode. Different configurations require different sets of Synergos components.
In this page, you can do the same by making selection from the two drop-down lists Configuration and Mode. After making your selections, the components required will be automatically populated and displayed in Step 2: Declare all components needed for this collaboration. You can also customise the pre-populated list by adding or removing components.
Verify your input and submit your collaboration entry in Step 3. After this, return to the Orchestrator Dashboard and proceed to the next step.
1B. Orchestrator creates a project
In the Orchestrator Dashboard page, click on Projects. This will direct you to the Project Actions page.
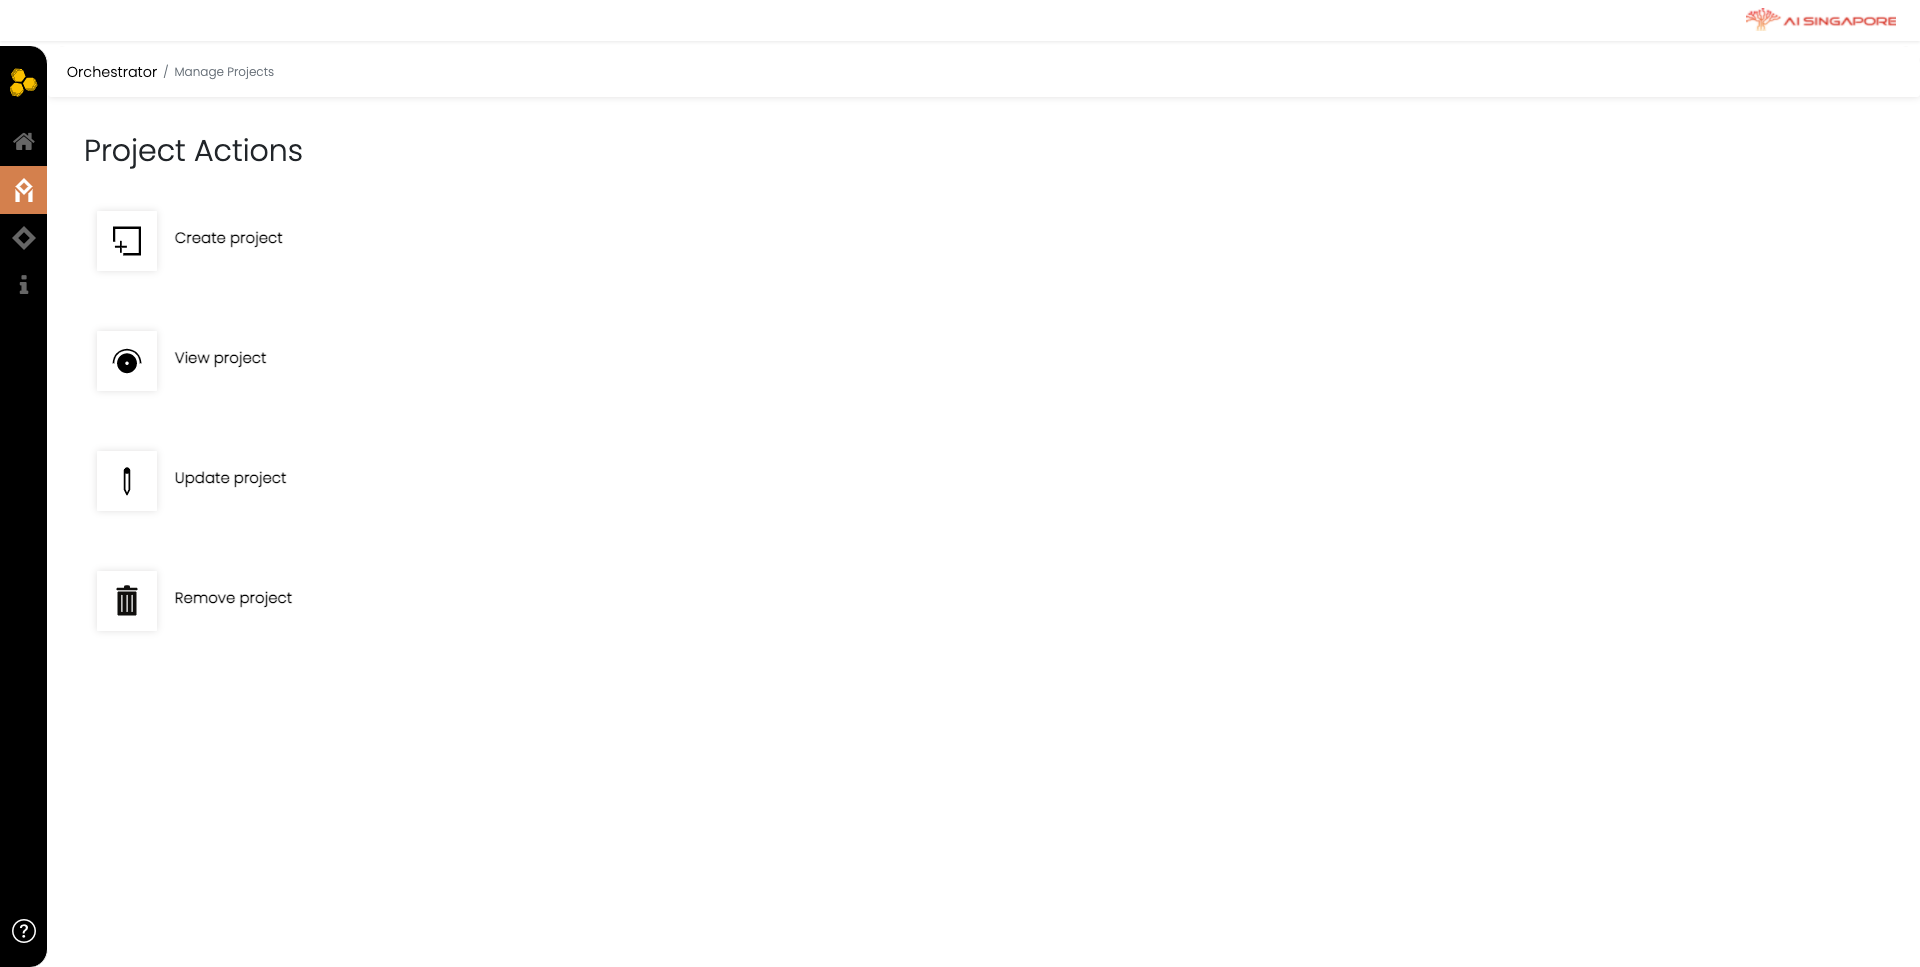
Click on Create project to create a project for the previously defined collaboration. This directs you to the Manage Projects page, as shown below.
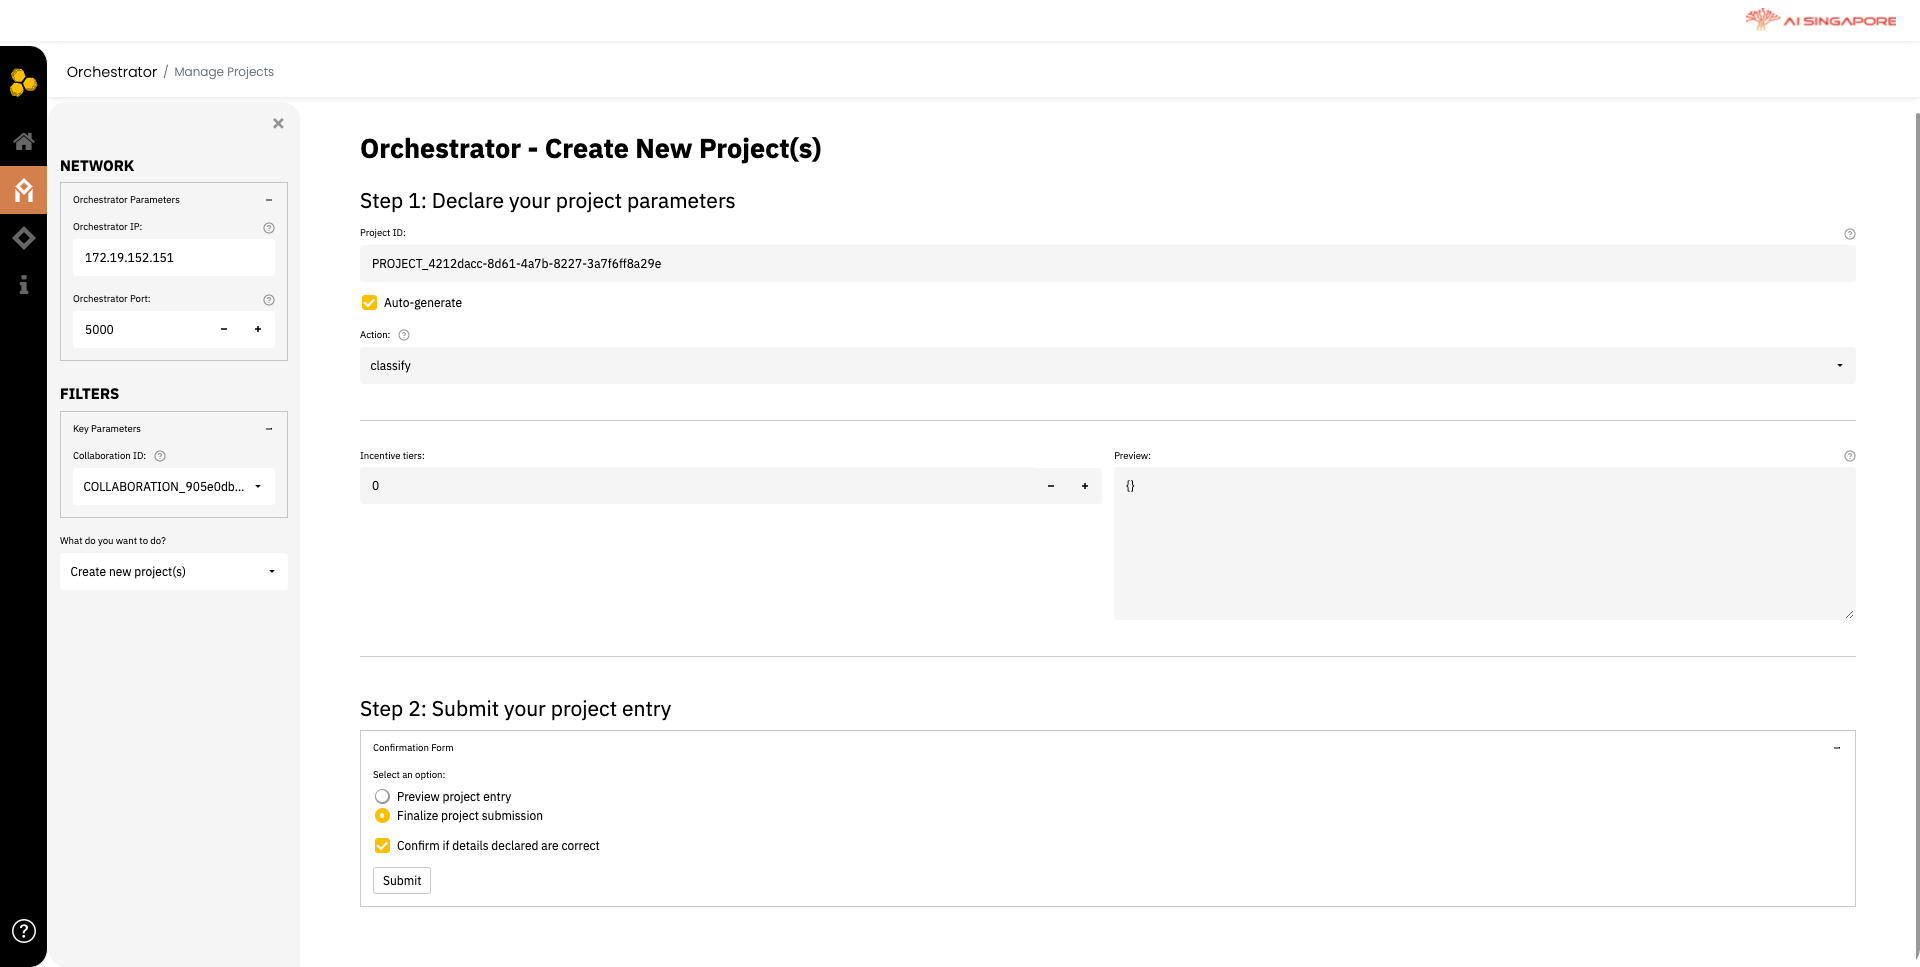
In the left panel, select the collaboration previously created in 1A, from the Collaboration ID drop-down list. Next, select Create new project(s) from the drop-down menu What do you want to do?.
Then in the right panel, key in the project ID manually or allow Synergos to Auto-generate.
Next choose Action. There are two kinds of action currently supported, "classify" if you are building a classification model or "regress" for regression model.
Verify your input and submit your project entry in Step 2. After this, return to the Orchestrator Dashboard and proceed to the next step.
1C. Orchestrator creates an experiment
In the Orchestrator Dashboard page, click on Experiments. This will direct you to the Experiment Actions page.
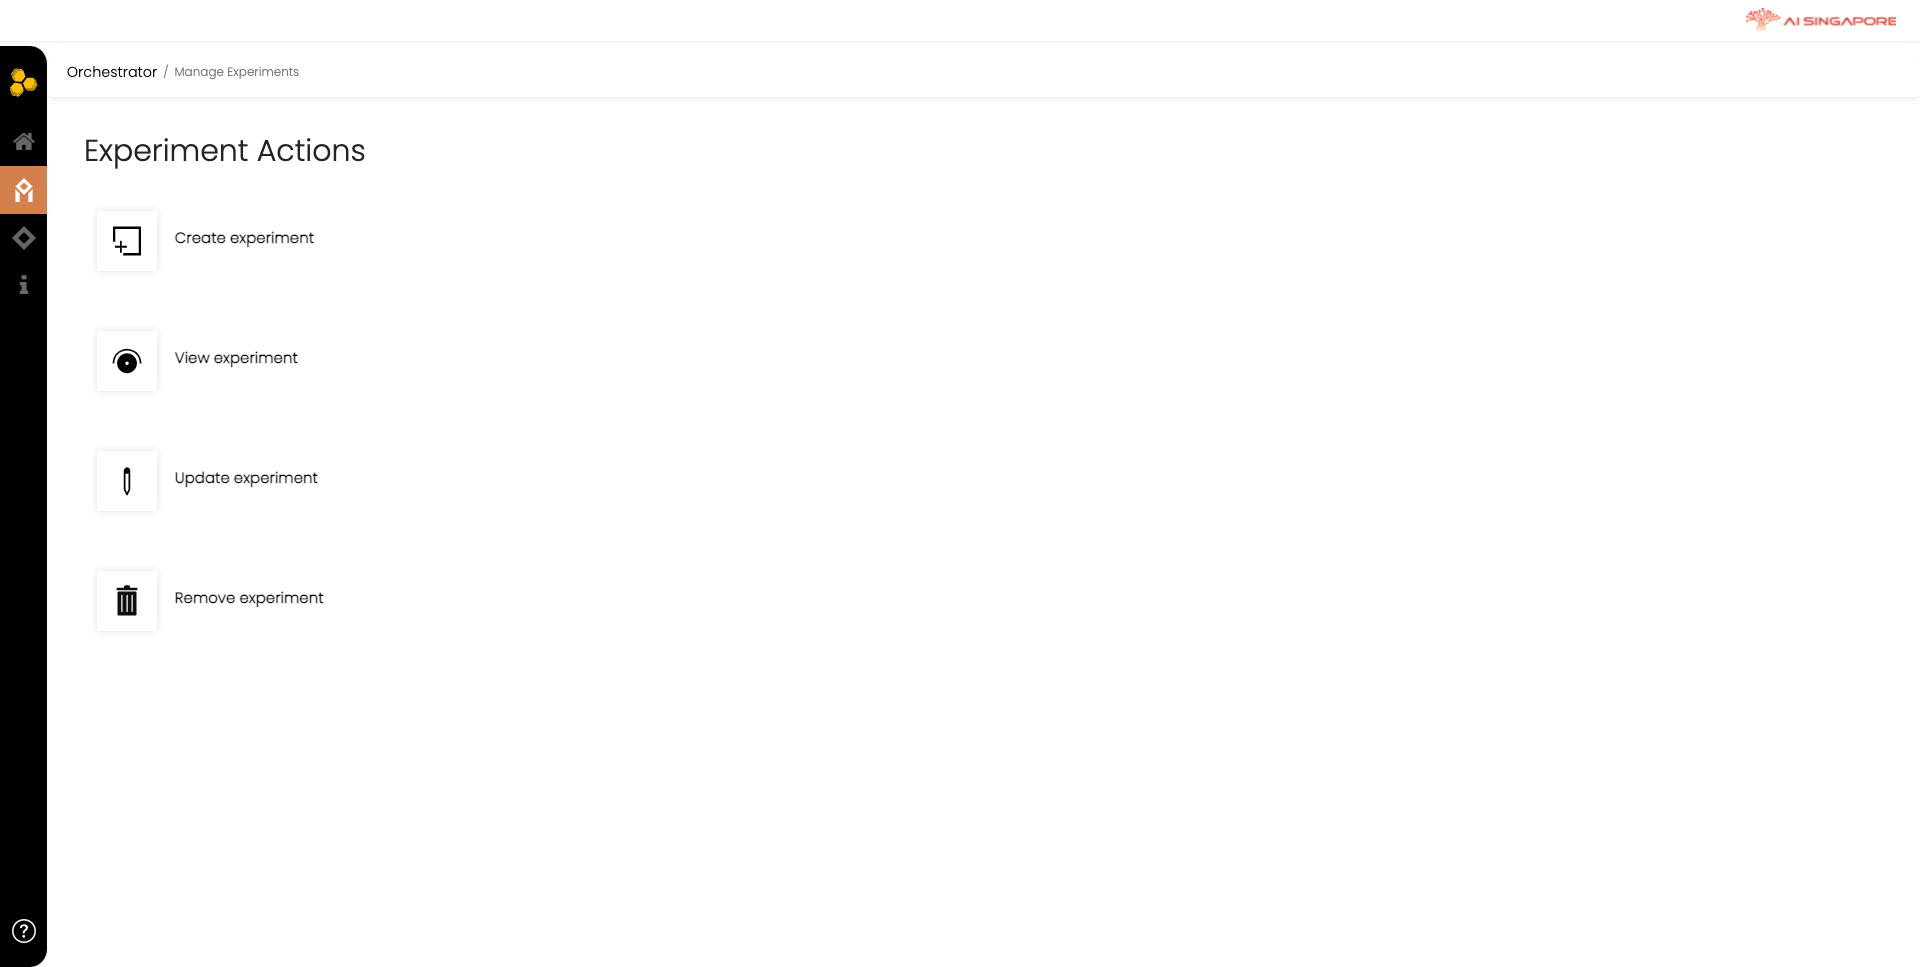
Click on Create experimentto create an experiment for your previously defined collaboration and project. This directs you to Manage Experiments page, as shown below.
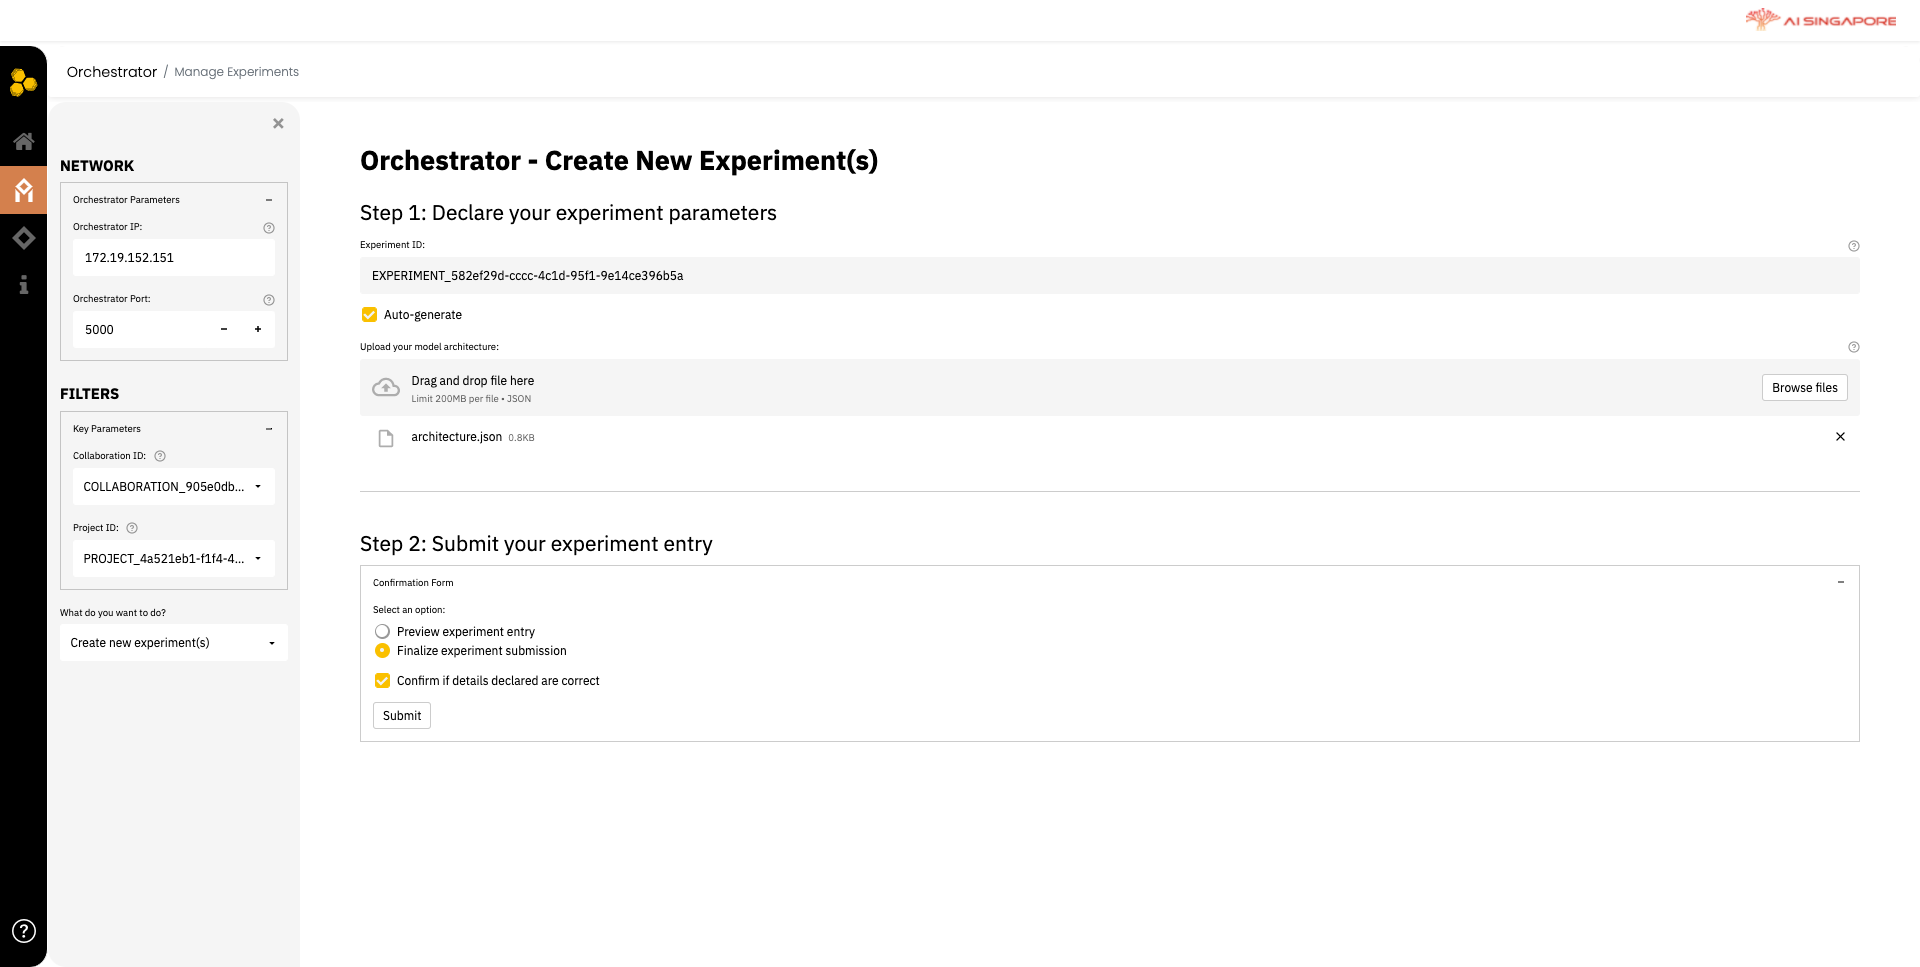
In the left panel, select the collaboration and project previously created in 1A and 1B, respectively from the Collaboration ID and Project ID drop-down lists. Next, select Create new experiment(s) from the drop-down menu What do you want to do?.
Then in the right panel, key in the experiment ID manually or allow Synergos to Auto-generate.
As discussed here, an experiment corresponds to a specific model architecture that is to be trained. Upload the model architecture in this page. In the current version of Synergos, model architecture has to be stored as a json file. The content is same as the one you defined in the python script in other running guides. An example is shown below:
[
    {
        "activation": "relu",
        "is_input": true,
        "l_type": "Conv2d",
        "structure": {
            "in_channels": 1,
            "out_channels": 6,
            "kernel_size": 3,
            "stride": 1,
            "padding": 1
        }
    },
    {
        "activation": null,
        "is_input": false,
        "l_type": "MaxPool2d",
        "structure": {
            "kernel_size": 3
        }
    },
    {
        "activation": null,
        "is_input": false,
        "l_type": "Flatten",
        "structure": {}
    },
    {
        "activation": "relu",
        "is_input": false,
        "l_type": "Linear",
        "structure": {
            "bias": true,
            "in_features": 600,
            "out_features": 3
        }
    }
]
The parameters required are:
activation- Any activation function found in the PyTorch'storch.nn.functionalmoduleis_input- Indicates if the current layer is an input layer. If a layer is an input layer, it is considered to be "wobbly" layer, meaning that the in-features may be modified automatically to accommodate changes in input structure post-alignment.l_type- Type of layer to be used, which can be found in PyTorch'storch.nnmodule.structure- Any input parameters accepted in the layer class specified inl_type
Verify your input and submit your experiment entry in Step 2. After this, return to the Orchestrator Dashboard and proceed to the next step.
1D. Orchestrator creates a run
In the Orchestrator Dashboard page, click on Runs. This will direct you to the Run Actions page.
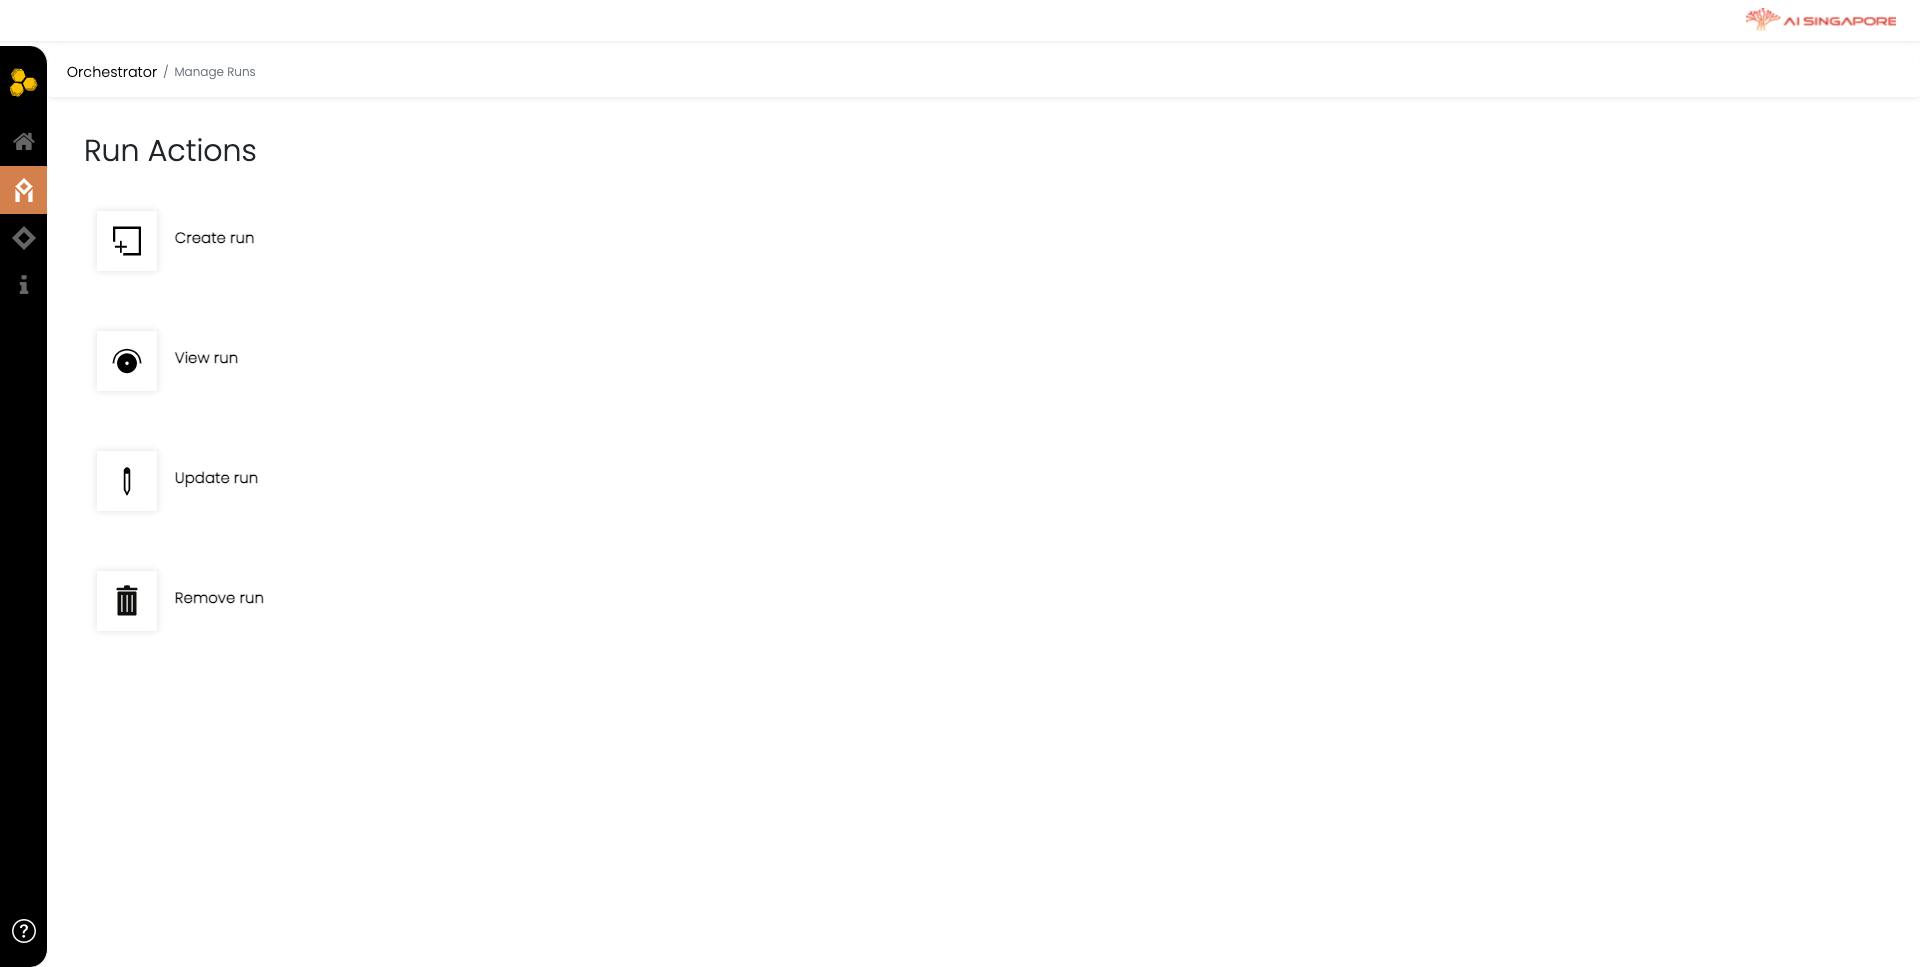
Click on Create run to create a run for your previously defined collaboration, project and experiment. This directs you to Manage Runs page, as shown below.

In the left panel, select the collaboration, project and experiment previously created in 1A, 1B and 1C, respectively from the Collaboration ID, Project ID and Experiment ID drop-down lists. Next, select Create new run(s) from the drop-down menu What do you want to do?.
Then in the right panel, key in the run ID manually or allow Synergos to Auto-generate.
As discussed here, a run corresponds to a specific set of hyper-parameters that is used in the training. Upload the hyper-parameter setting here. In the current version of Synergos, hyper-parameter setting has to be stored as a json file. The content is same as the one you defined in the python script in other running guides. An example is shown below:
{
    "algorithm": "FedProx",
    "rounds": 2,
    "epochs": 1,
    "lr": 0.001,
    "base_lr": 0.001,
    "max_lr": 0.01,
    "criterion": "CrossEntropyLoss",
    "weight_decay": 0.0,
    "lr_decay": 0.1,
    "mu": 0.1,
    "l1_lambda": 0.0,
    "l2_lambda": 0.0,
    "optimizer": "SGD",
    "lr_scheduler": "CyclicLR",
    "delta": 0.0,
    "patience": 10
}
Verify your input and submit your run entry in Step 2. After this, return to the Orchestrator Dashboard and proceed to the next step in Phase 2: Training.
1E. Orchestrator defines hyper-parameter optimization (optional)
In 1D, you created a run with a specific set of hyper-parameters. There are also cases that you want to do hyper-parameter optimization. To run hyper-parameter optimization, you have to use Synergos Cluster. A guide on run Synergos Cluster can be referred here. Once the Synergos Cluster has been set up, configure Collaborations according to include the additional Synergos components.
In the Orchestrator Dashboard page, click on Optimize. This will direct you to the Optimization Actions page.
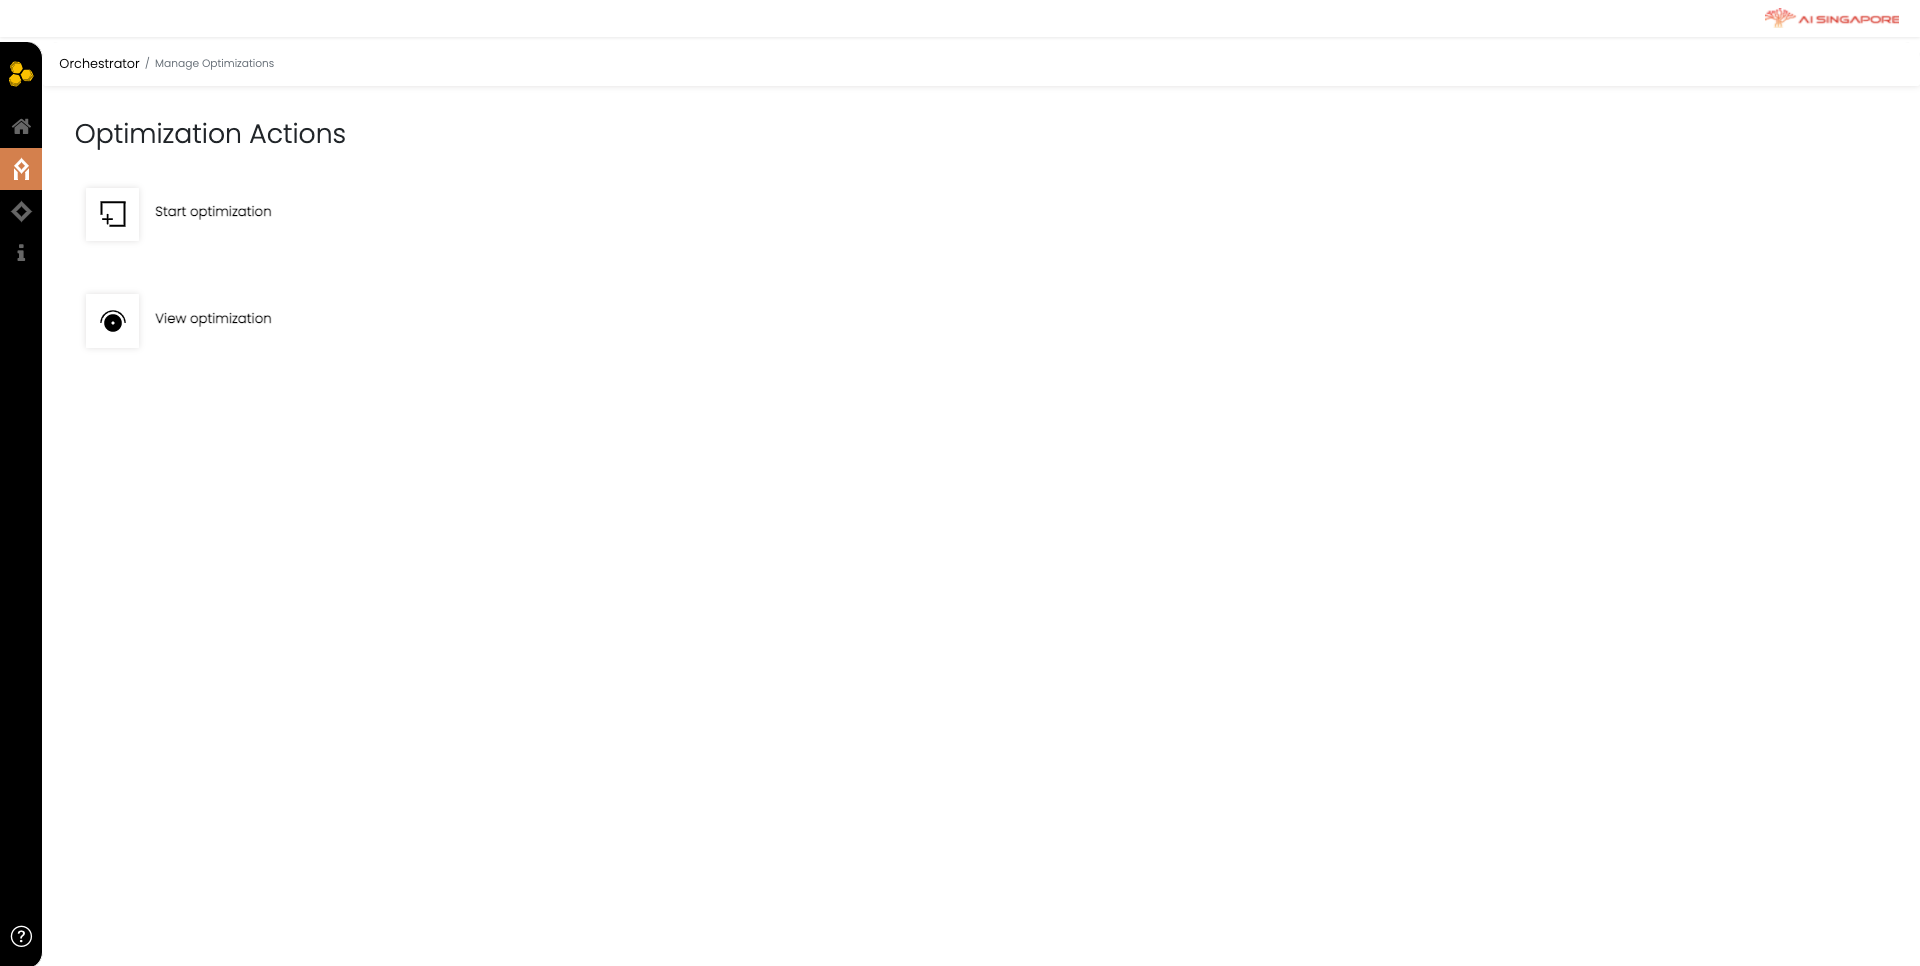
Click on Start optimization to create a run for your previously defined collaboration, project and experiment. This directs you to Manage Optimizations page, as shown below.
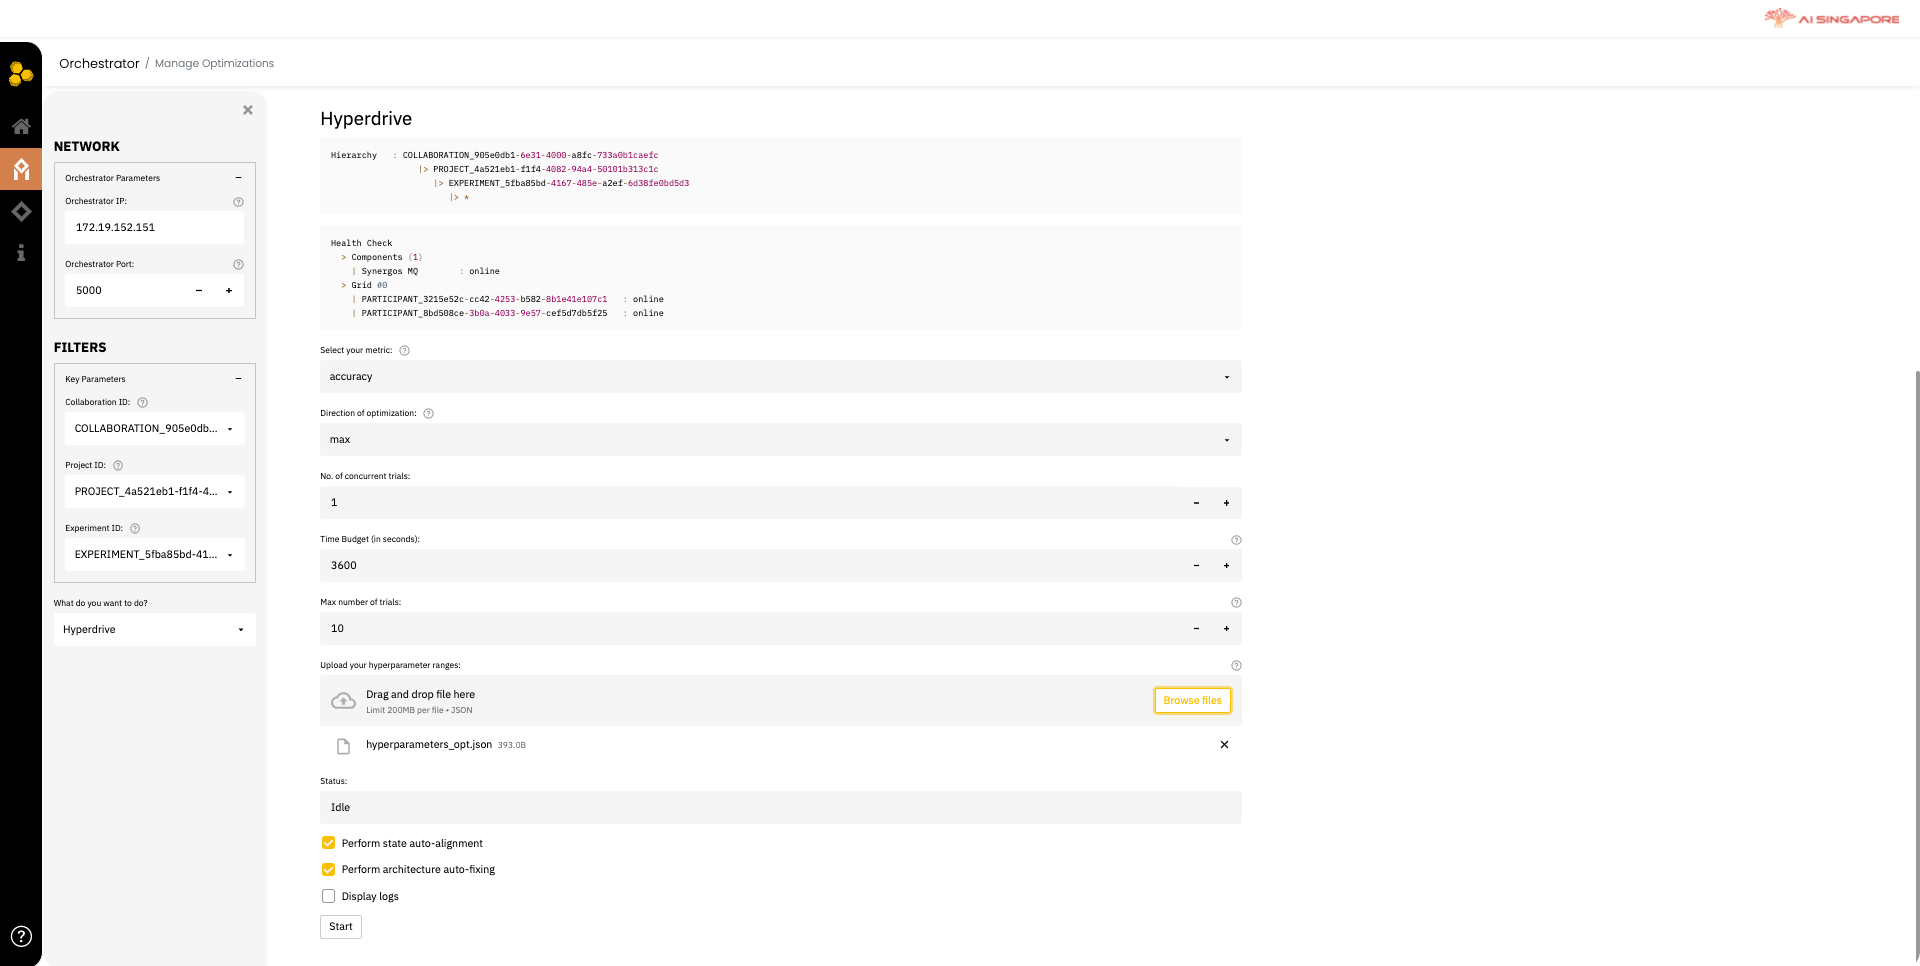
In this page, the general health of the grid, its participants and models' performances can be monitored, with the additional section to configure the optimization process.
In the left panel, select the collaboration, project and experiment previously created in 1A, 1B and 1C, respectively from the Collaboration ID, Project ID and Experiment ID drop-down lists. Next, select Hyperdrive from the drop-down menu What do you want to do?.
In the Hyperdrive section, configure your settings for the optimization process and upload a json of the intended hyper-parameter search space. The format of defining the search space is similar to the Python scripting version of running Synergos hyper-parameter optimization, and can be referred to here.
Once configured, you can click on the Start button to begin the hyper-parameter optimization process.
Now the orchestrator has declared all the necessary metadata to start a federated learning job. Meta-data about the participants is also needed before the federated learning job can be started.
Participants need to go to Synergos Dashboard installed on their end, navigate to Participant Dashboard to register their information. You can refer to the Participant flow guide below to see how participants register their information.
Phase 2: Training
As the orchestrator, you are responsible to start the federated training in Phase 2. Before you start, all participants need to complete their compute resource and data registration process.
In the Orchestrator Dashboard, click on Analyse. This directs you to the following page - Analytics Actions, as shown below.
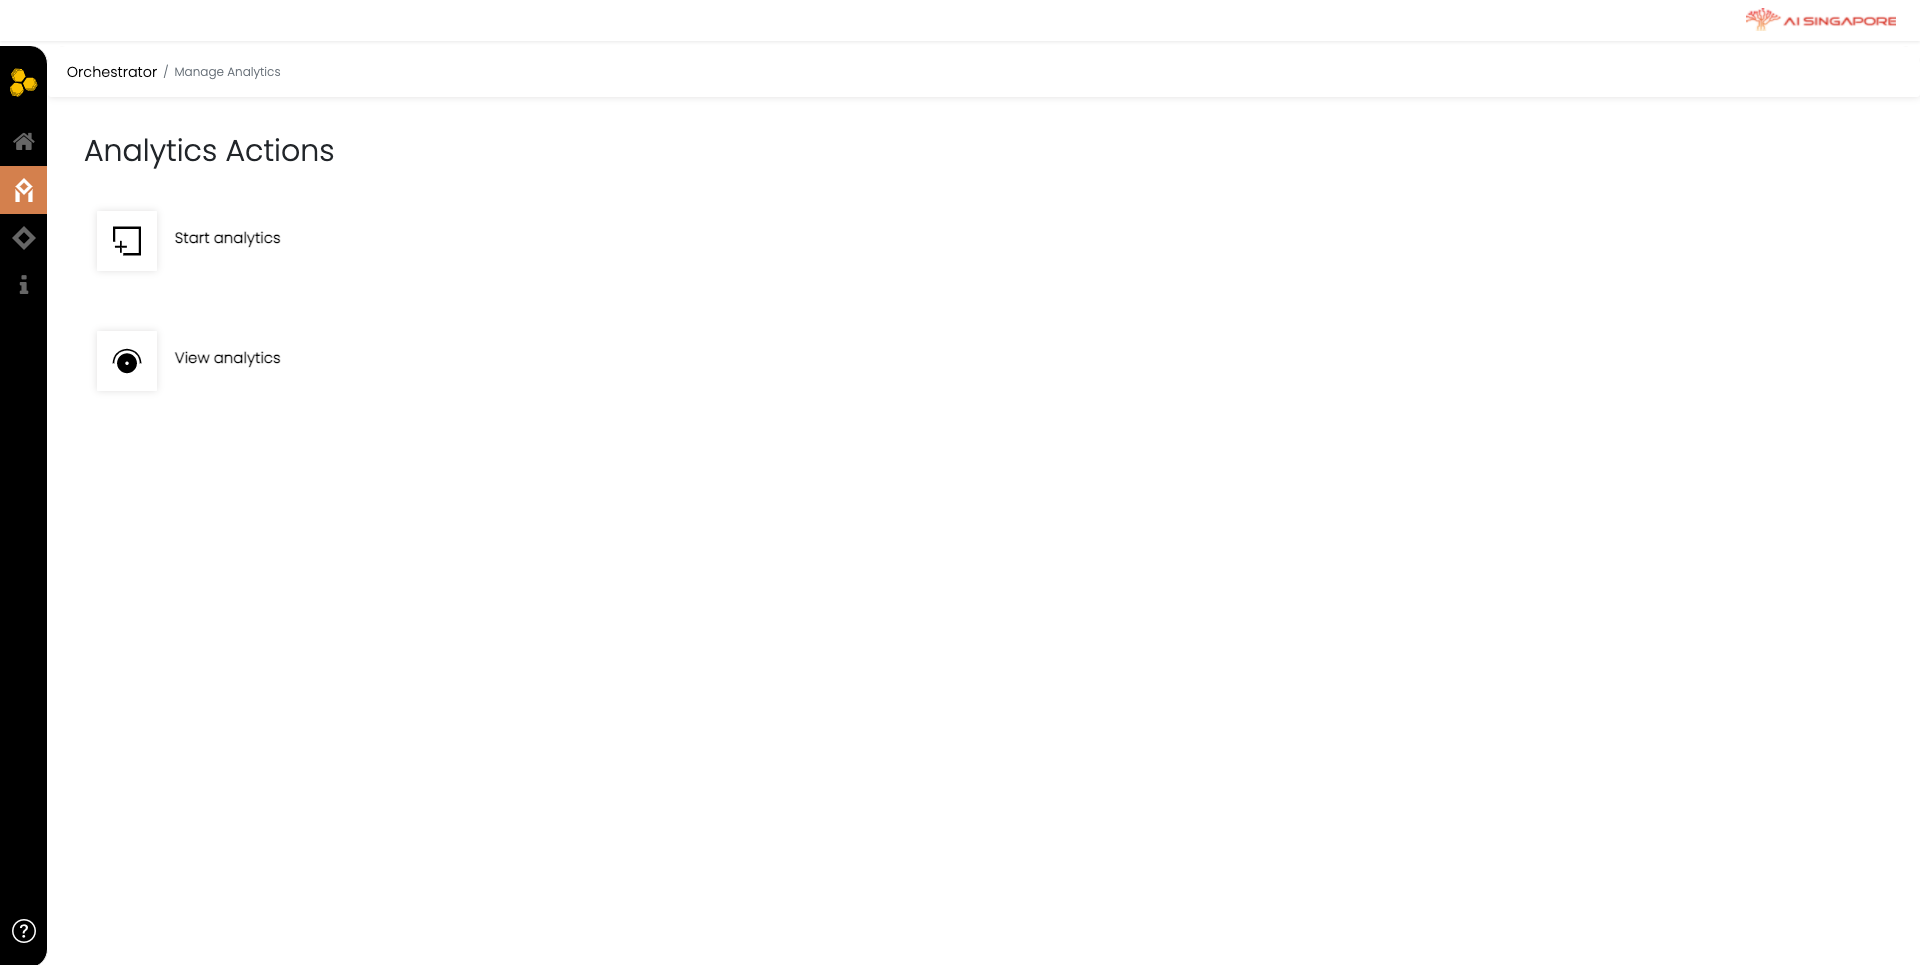
Click on Start Analytics to view the status of your federated grid and configurations, for the previously defined collaboration, project, experiment and run. This directs you to Manage Analytics page, as shown below.
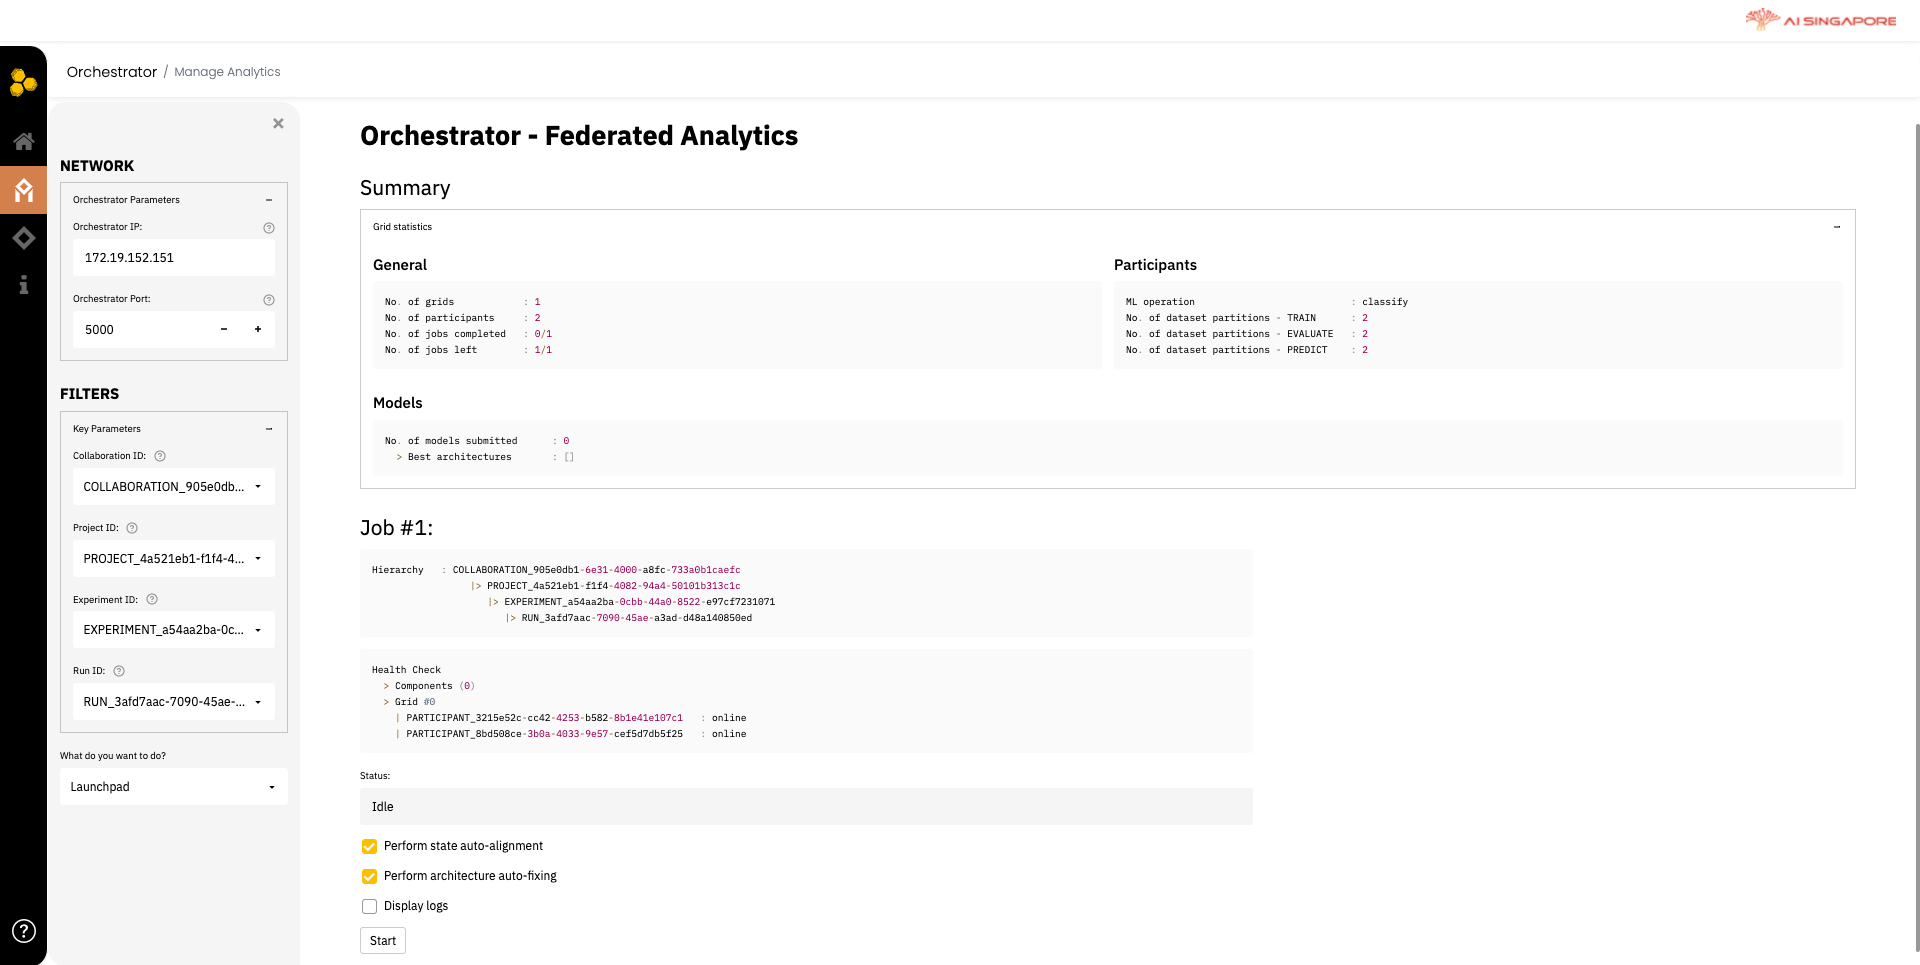
In this dashboard, the general health of the grid, its participants and models' performances can be monitored.
In the left panel, select the collaboration, project, experiment, run previously created in 1A, 1B, 1C and 1D, respectively from the Collaboration ID, Project ID, Experiment ID and Run ID drop-down lists. Next, select Launchpad from the drop-down menu What do you want to do?.
Start the training by clicking on the Start button that appears.
This page is very similar to the Hyperdrive page seen in Step 1E. The main difference is that users can configure the hyper-parameter optimization in Hyperdrive.
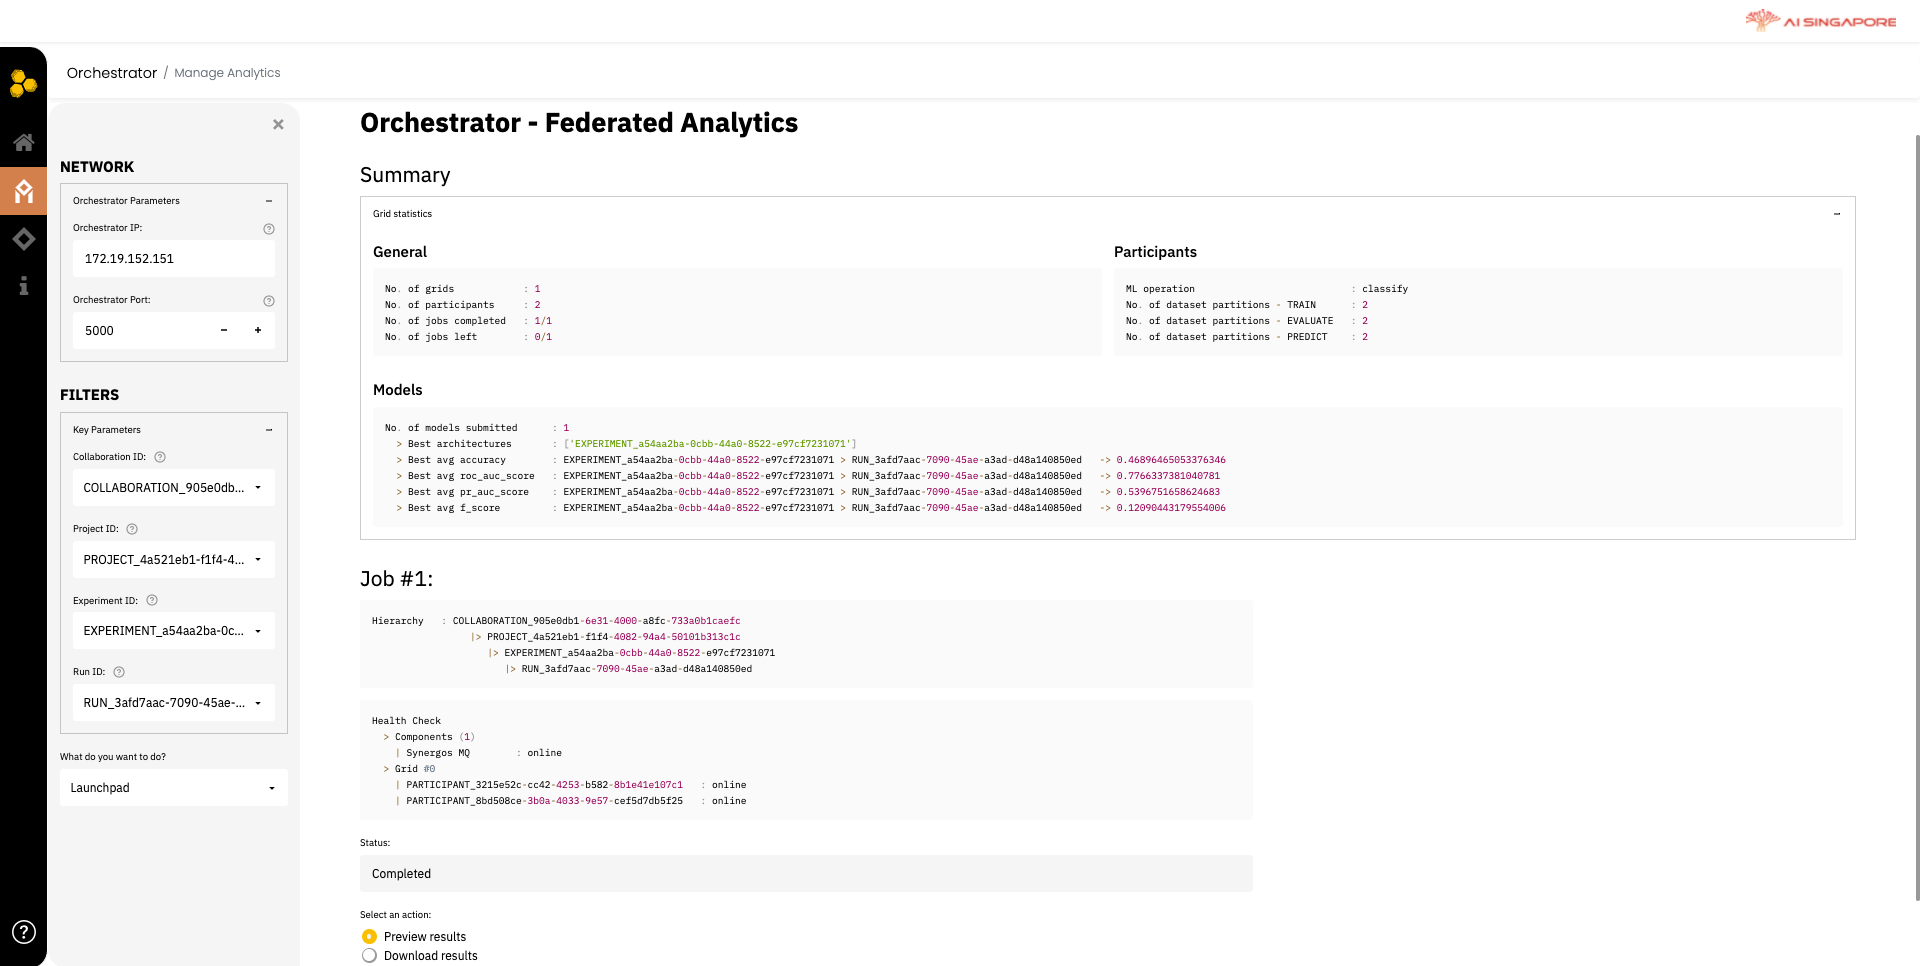
Once training and evaluation is completed for the specific run, the dashboard will display the best architecture for the project and best metrics. Additionally, the results for the specific run, can be previewed or downloaded according to your choice, as shown below.
Phase 3: Evaluation
In this phase, it is mainly for the participants to apply new data on the trained model to conduct inference. Please refer to the Participant Flow section to see what participants can do in this phase.
Participant workflow
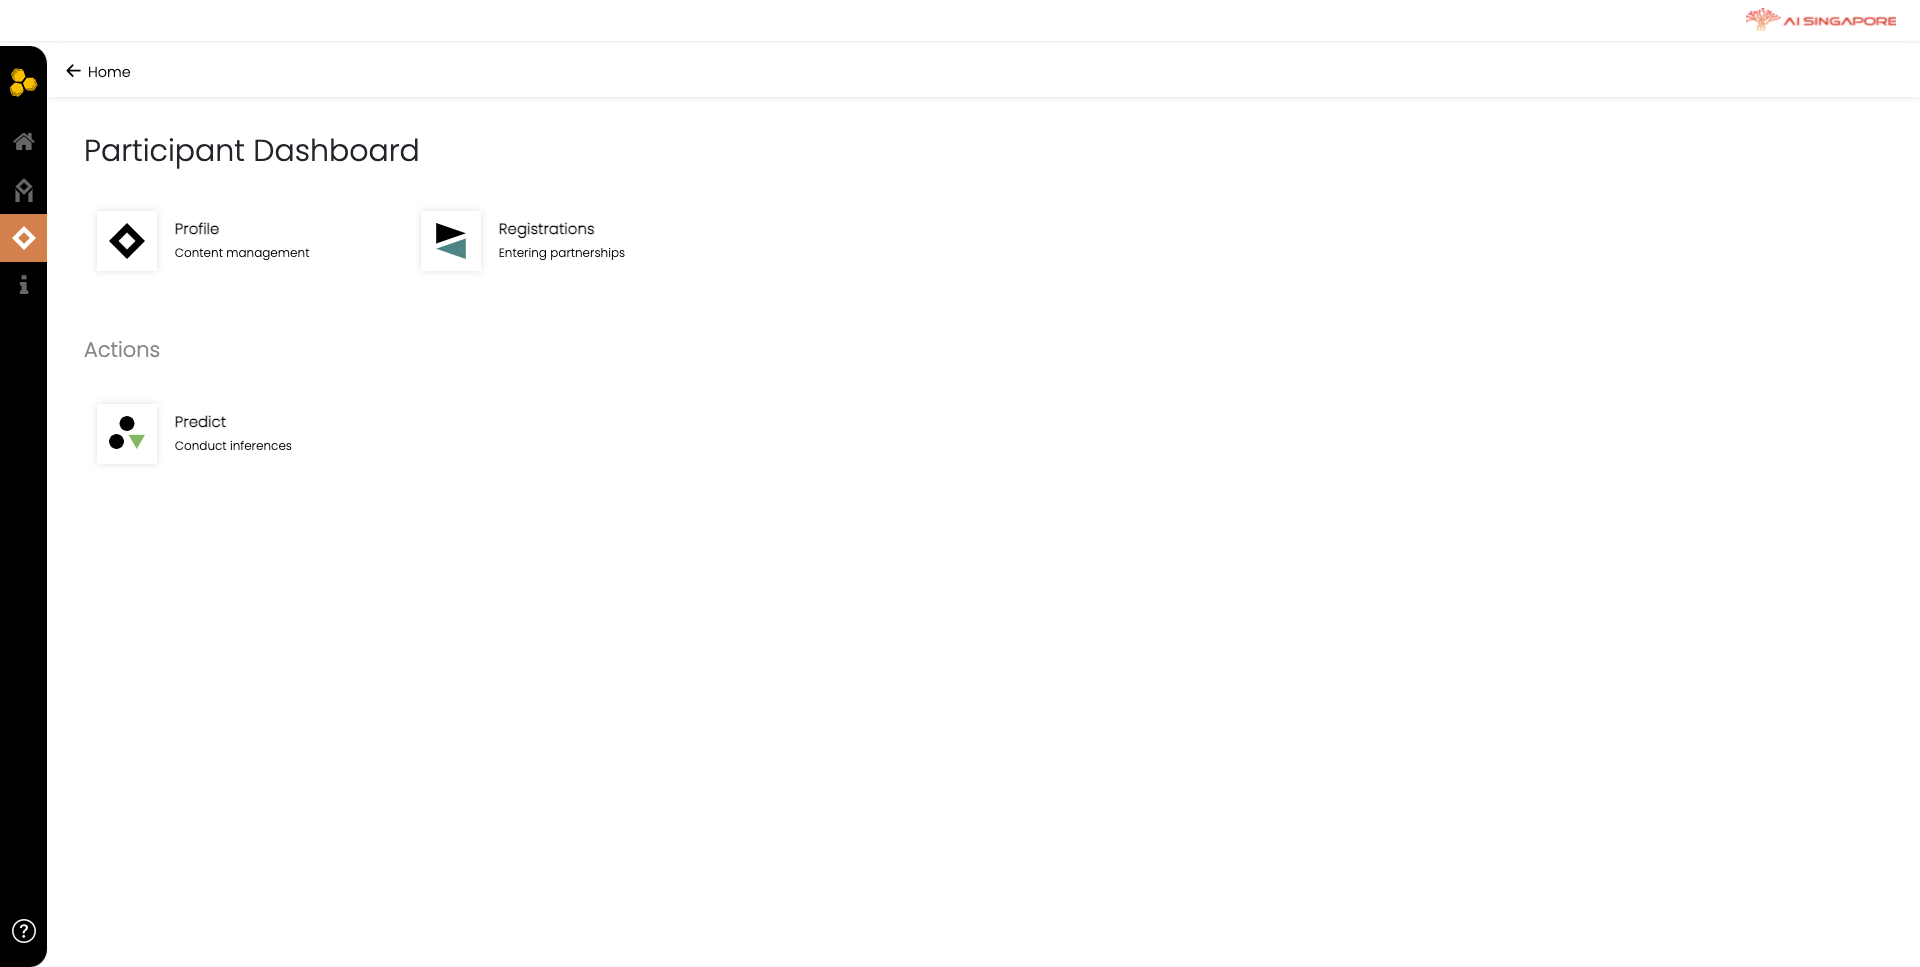
If you are a participant, click on the Participant button in main page. This redirects you to the Participant Dashboard. In this page, you can define your profile, register your resources, and call for prediction on new data, after training.
Phase 1: Registration
1A. Participant creates Profile
In the Participant Dashboard, click on Profile. This will direct you to the Profile Actions page.
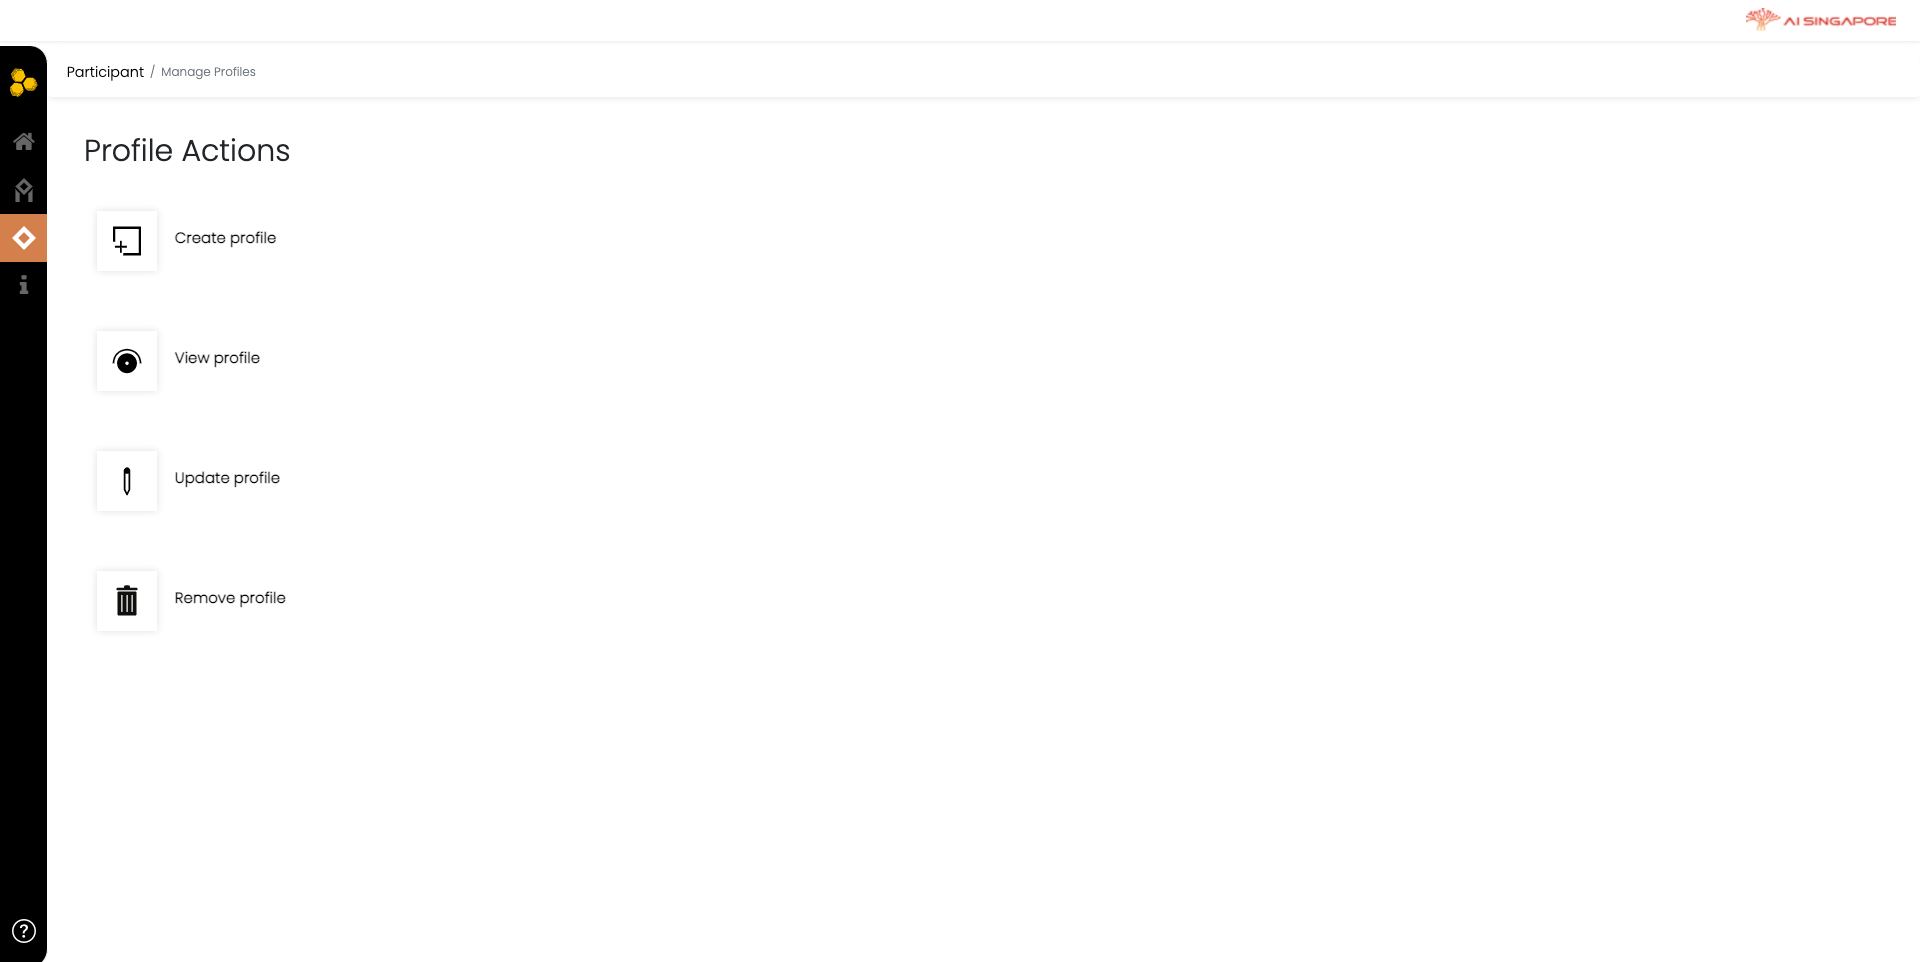
Click on Create profile to create a profile for yourself, as the participant. This directs you the Manage Profiles page, as shown below.
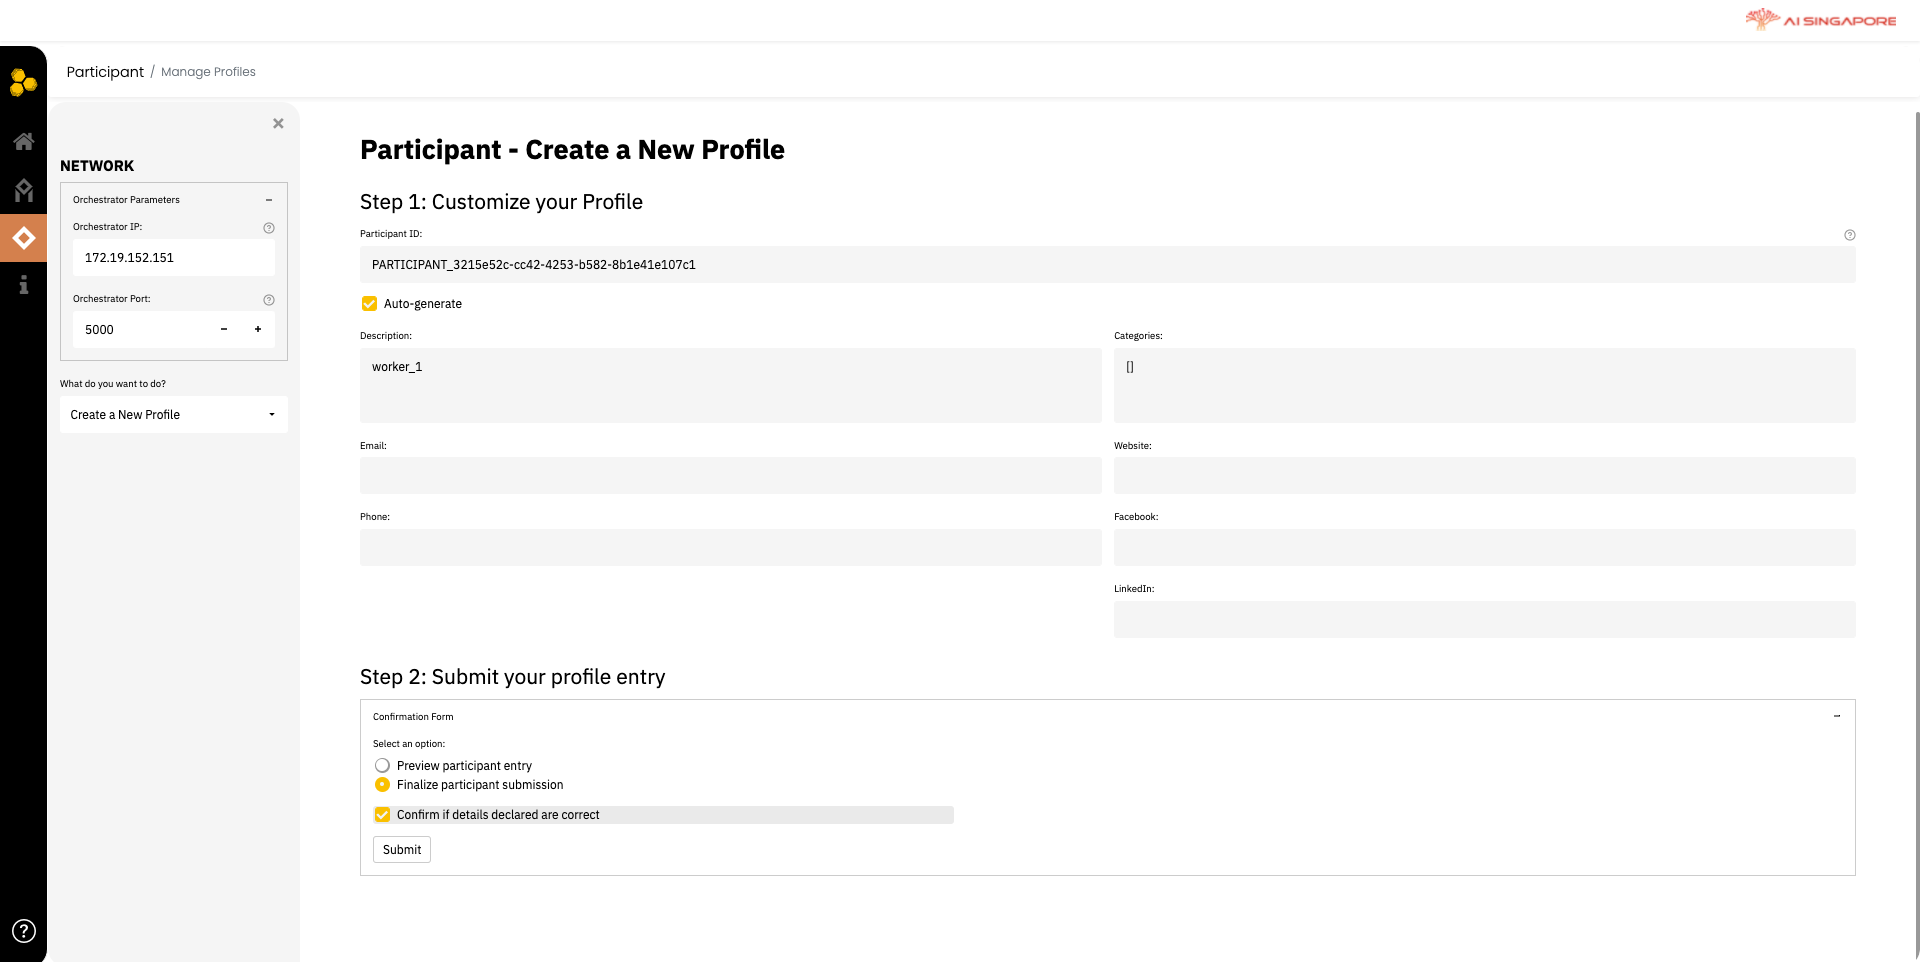
Same as what you have seen in other running guides (e.g. here), as a participant, you first need to register to the project created by the orchestrator.
To do the same in Synergos Dashboard, you create a profile. To create the new profile, select the action from the drop-down menu labeled What do you want to do? on the left panel. Provide the necessary information on the right panel.
After this, return to the Participant Dashboard and proceed to the next step.
1B. Participant declares the compute resource and data it is contributing
After a profile has been created, the participant needs to register the compute resource it is contributing. In the Participant Dashboard, click on Registrations. This will direct you to the Registration Actions page
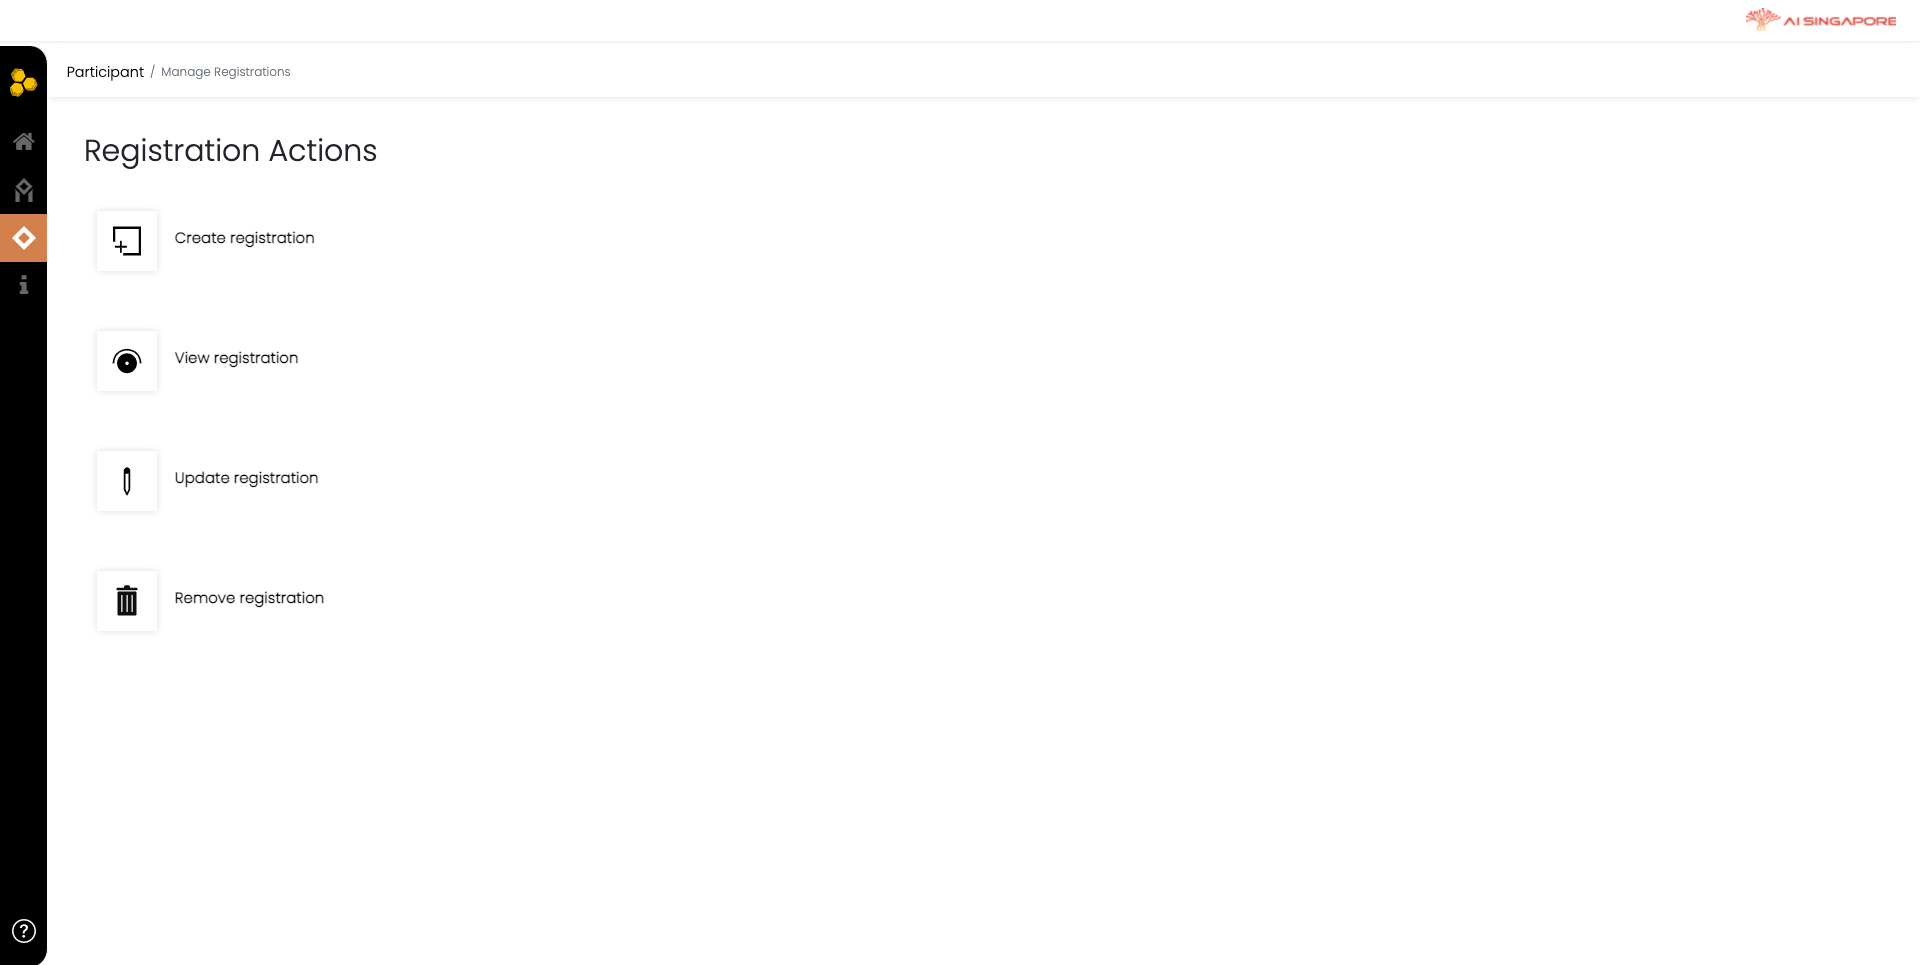
Click on Create registration to register your compute resource and contributed dataset tags. This directs you the Manage Registrations page, as shown below.
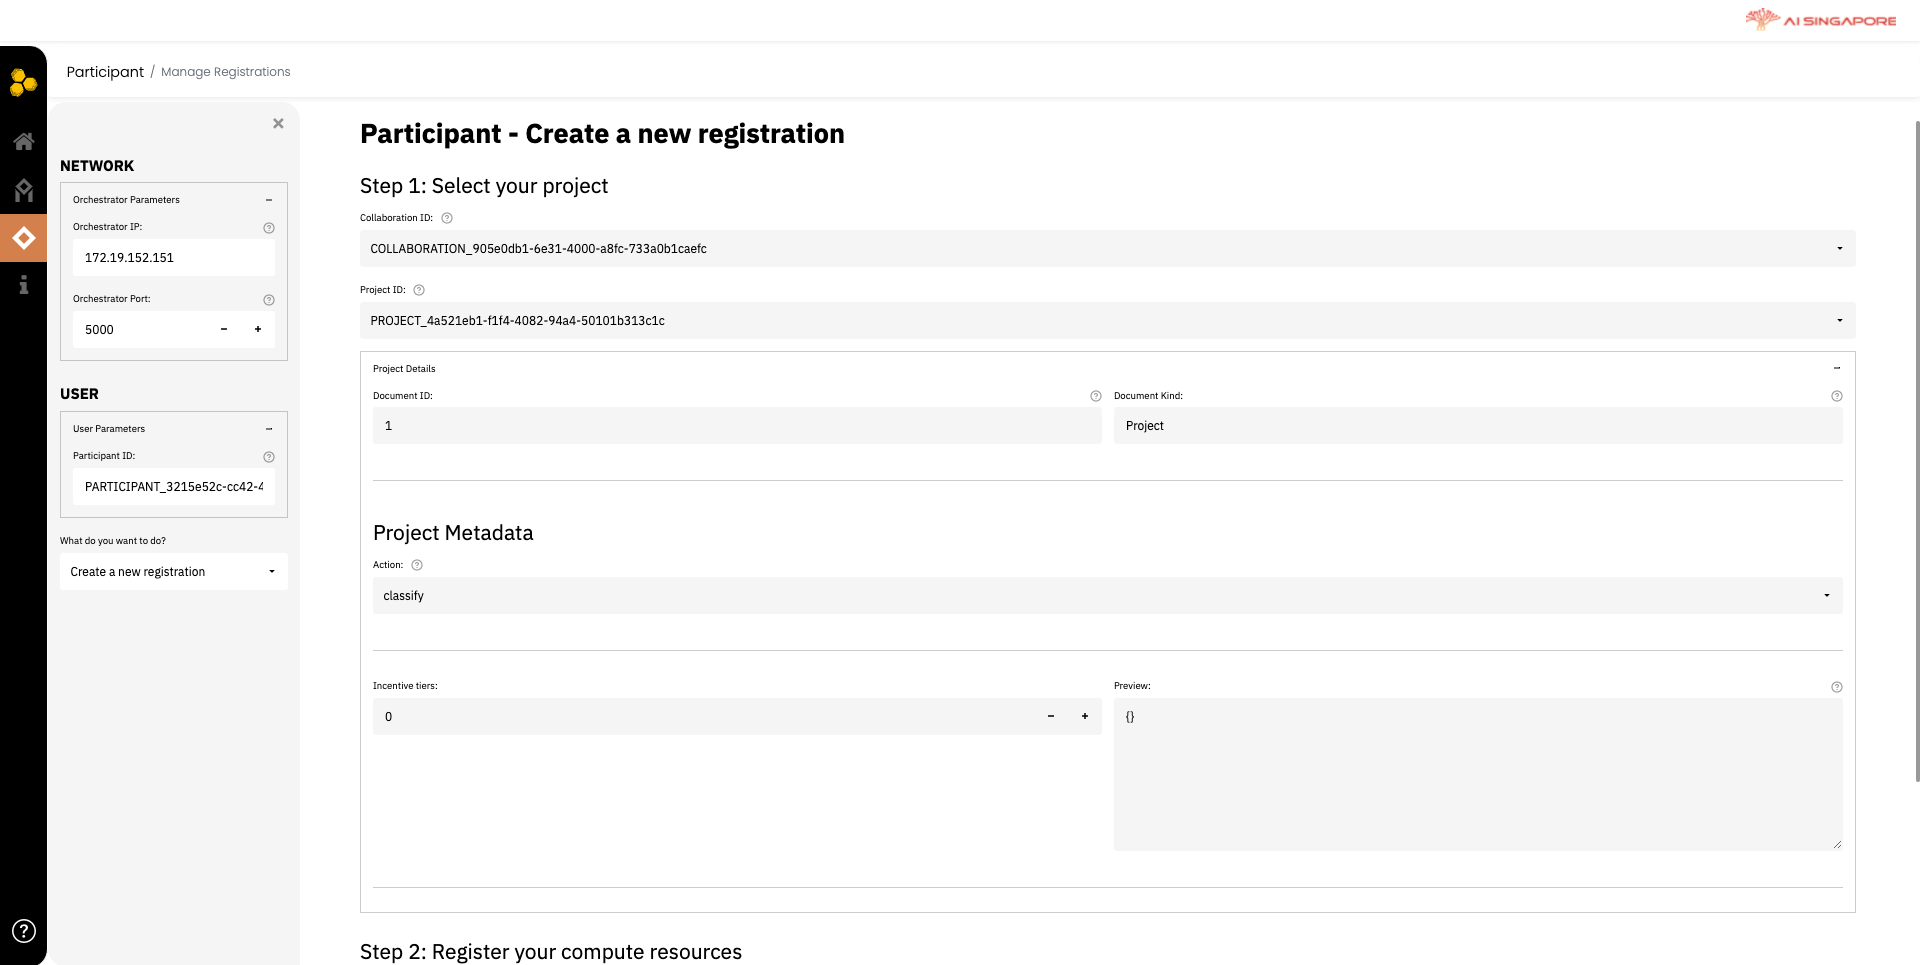
In the left panel, fill the Participant ID field (defined when previously creating the profile) in the User tab; select the action Create a new registration, from the drop-down menu What do you want to do? on the left panel.
This renders the respective field required to register the profile for a project. In Step 1 displayed in the right panel, select the respective Collaboration ID and Project ID which this participant will be registered for.
Register the compute resource in Step 2 as shown below. Fill the corresponding IP address and ports. Data Port is the port that is that is used to communicate with other parties during the federated learning process to exchang intermediate training results; while Command Port is the port that is used to receive commands, e.g. dismantle the federated grid. Data Port and Command Port correspond to the port and fport paramemters respective in the Synergos script in other guides.
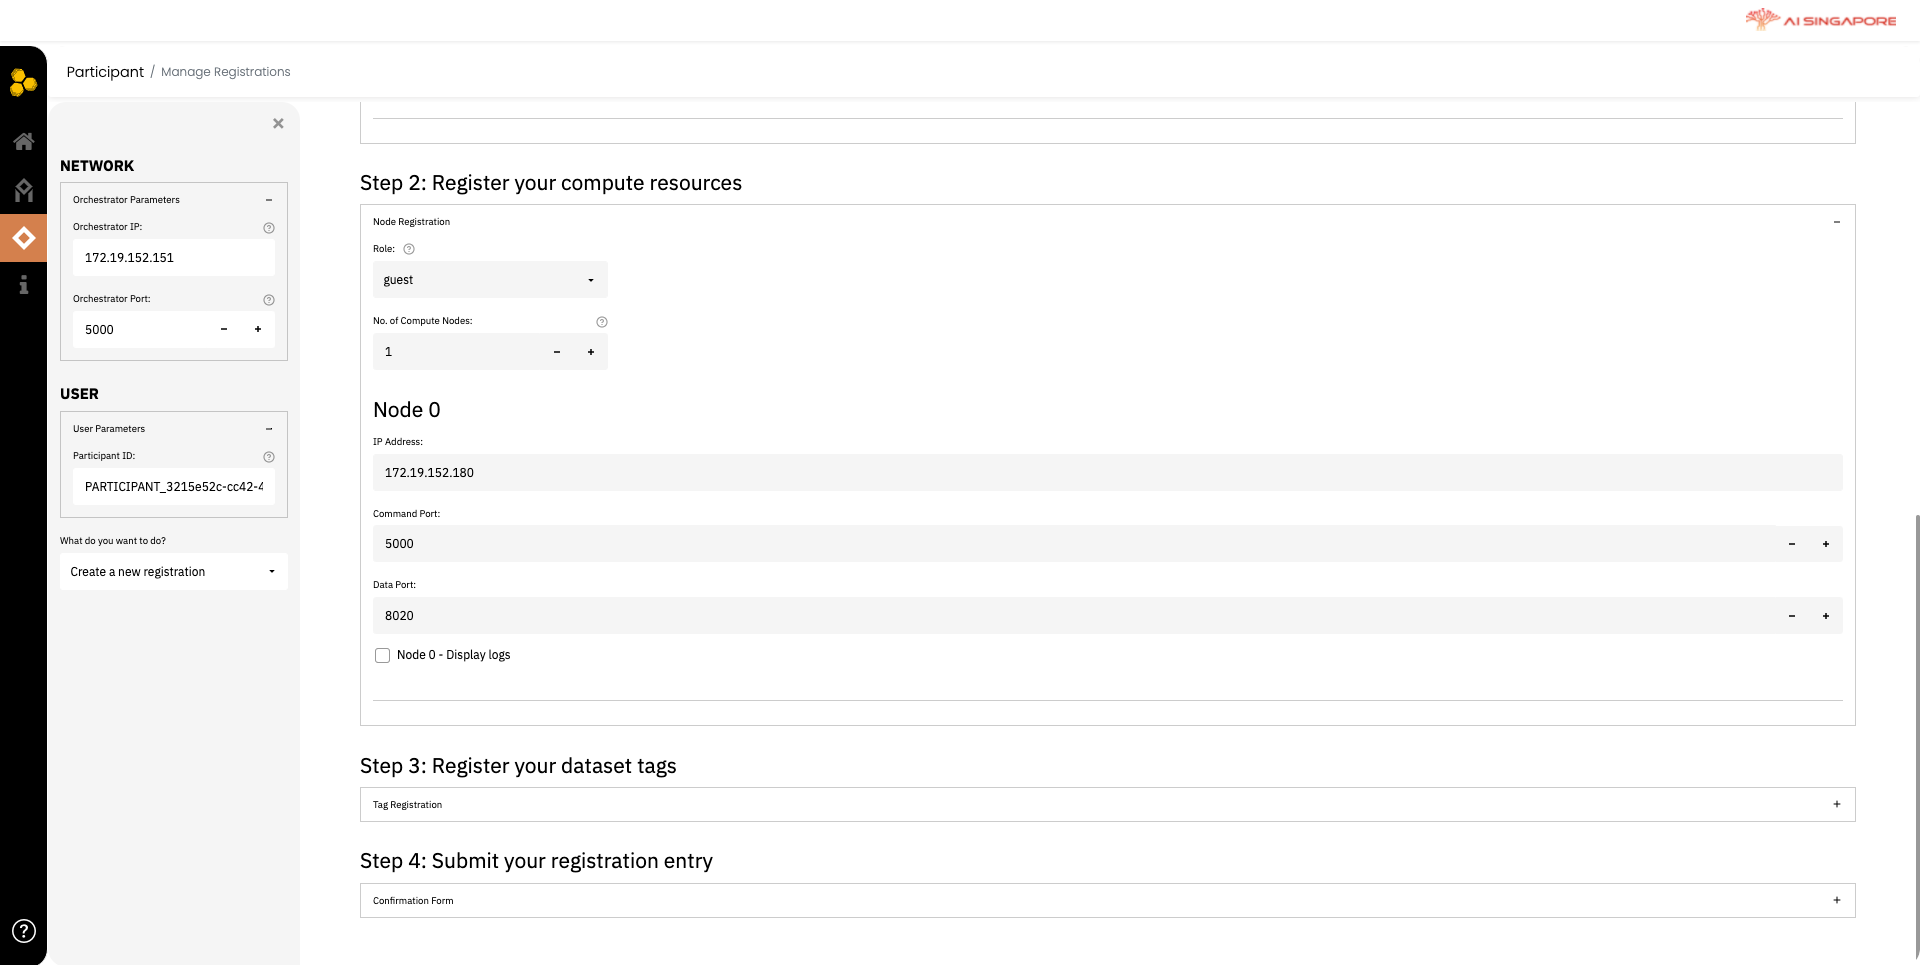
After registering the compute resources, scroll down to declare the data available for this project, in Step 3 as shown below.
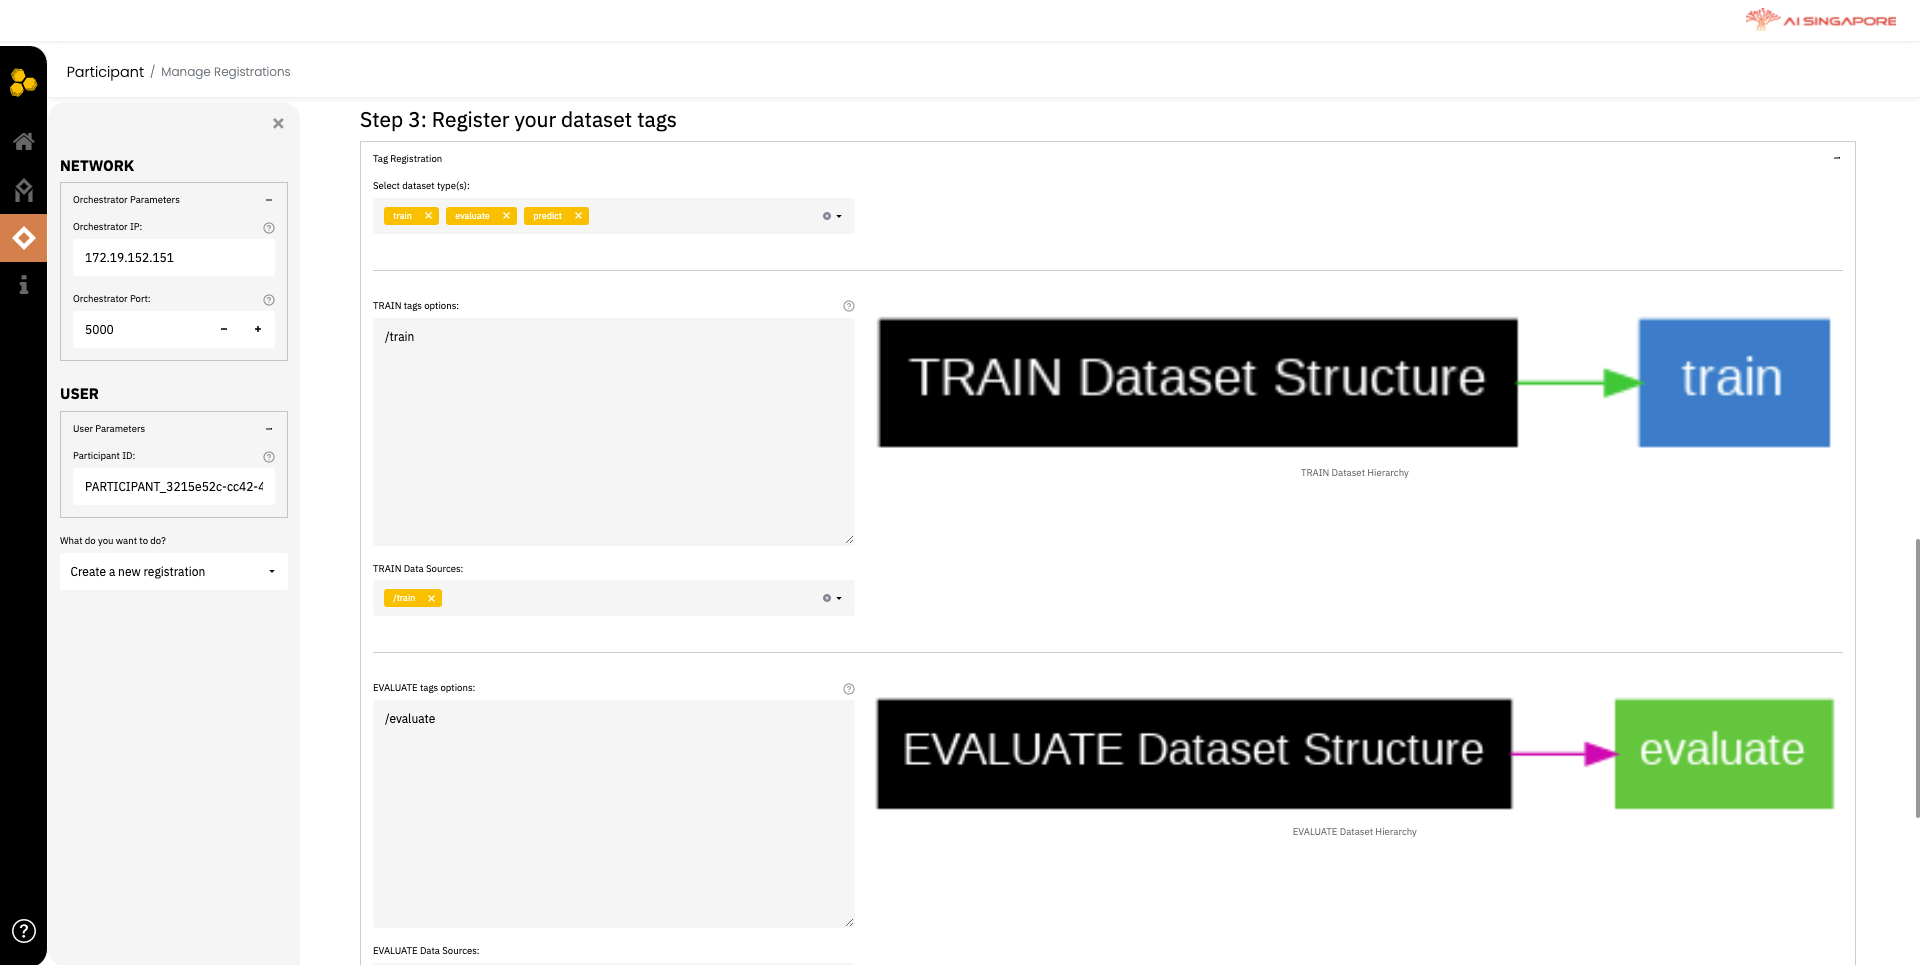
Although workers are contributing data, they are not exposing data to other parties. So they are declaring tags of their data to the project they registered above. For more information on how to define the data tag, refer to this.
Enter the names of the data tags intended for each purpose - train, evaluate and predict. In this stage, the tag for predict does not have to be defined. The predict tag can be defined later (in Inference Actions), when you want to make predictions on fresh data with the trained model.
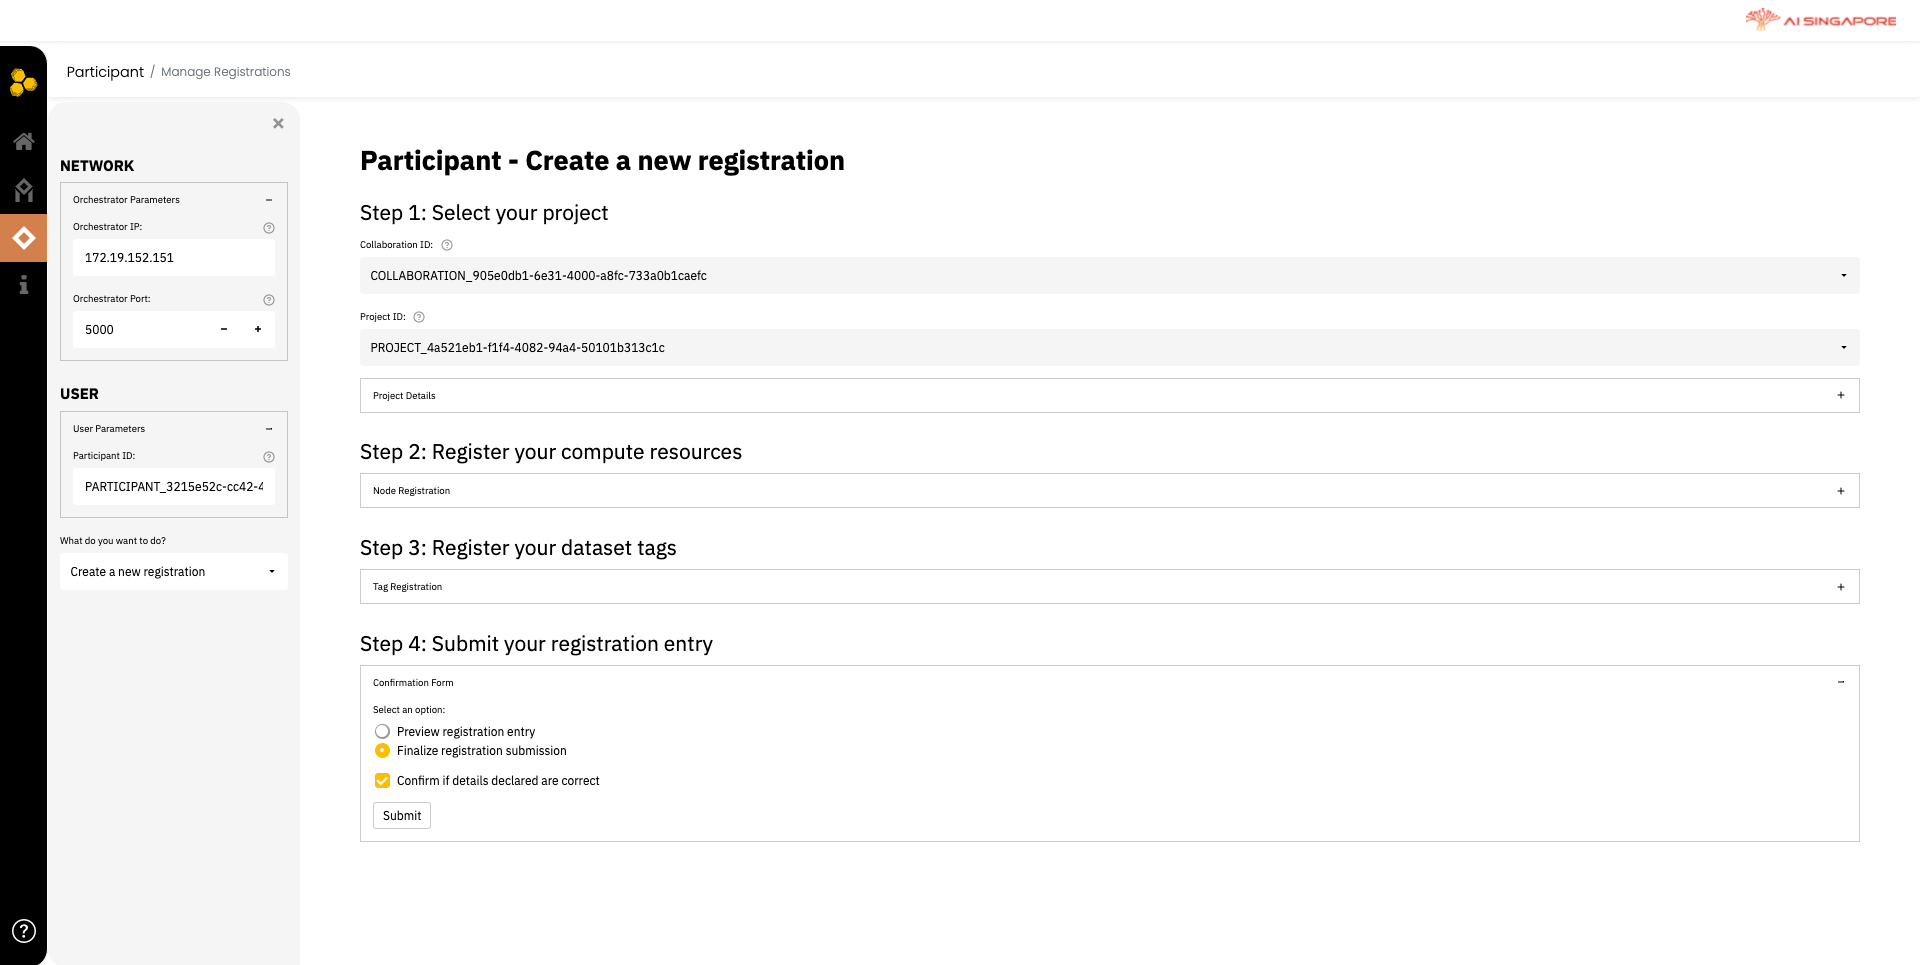
Once your tags have been defined, you can proceed to submit the registration entry in Step 4 as shown below.
Once registered, the participant can remain passive as the orchestrator proceeds through the relevant steps to start federated training.
Phase 2: Training
No action required from the participants in Phase 2, as the federated training will be started by the orchestrator. The orchestrator waits for all participants to finish their compute resource and data registration before it starts the training.
Phase 3: Evaluation
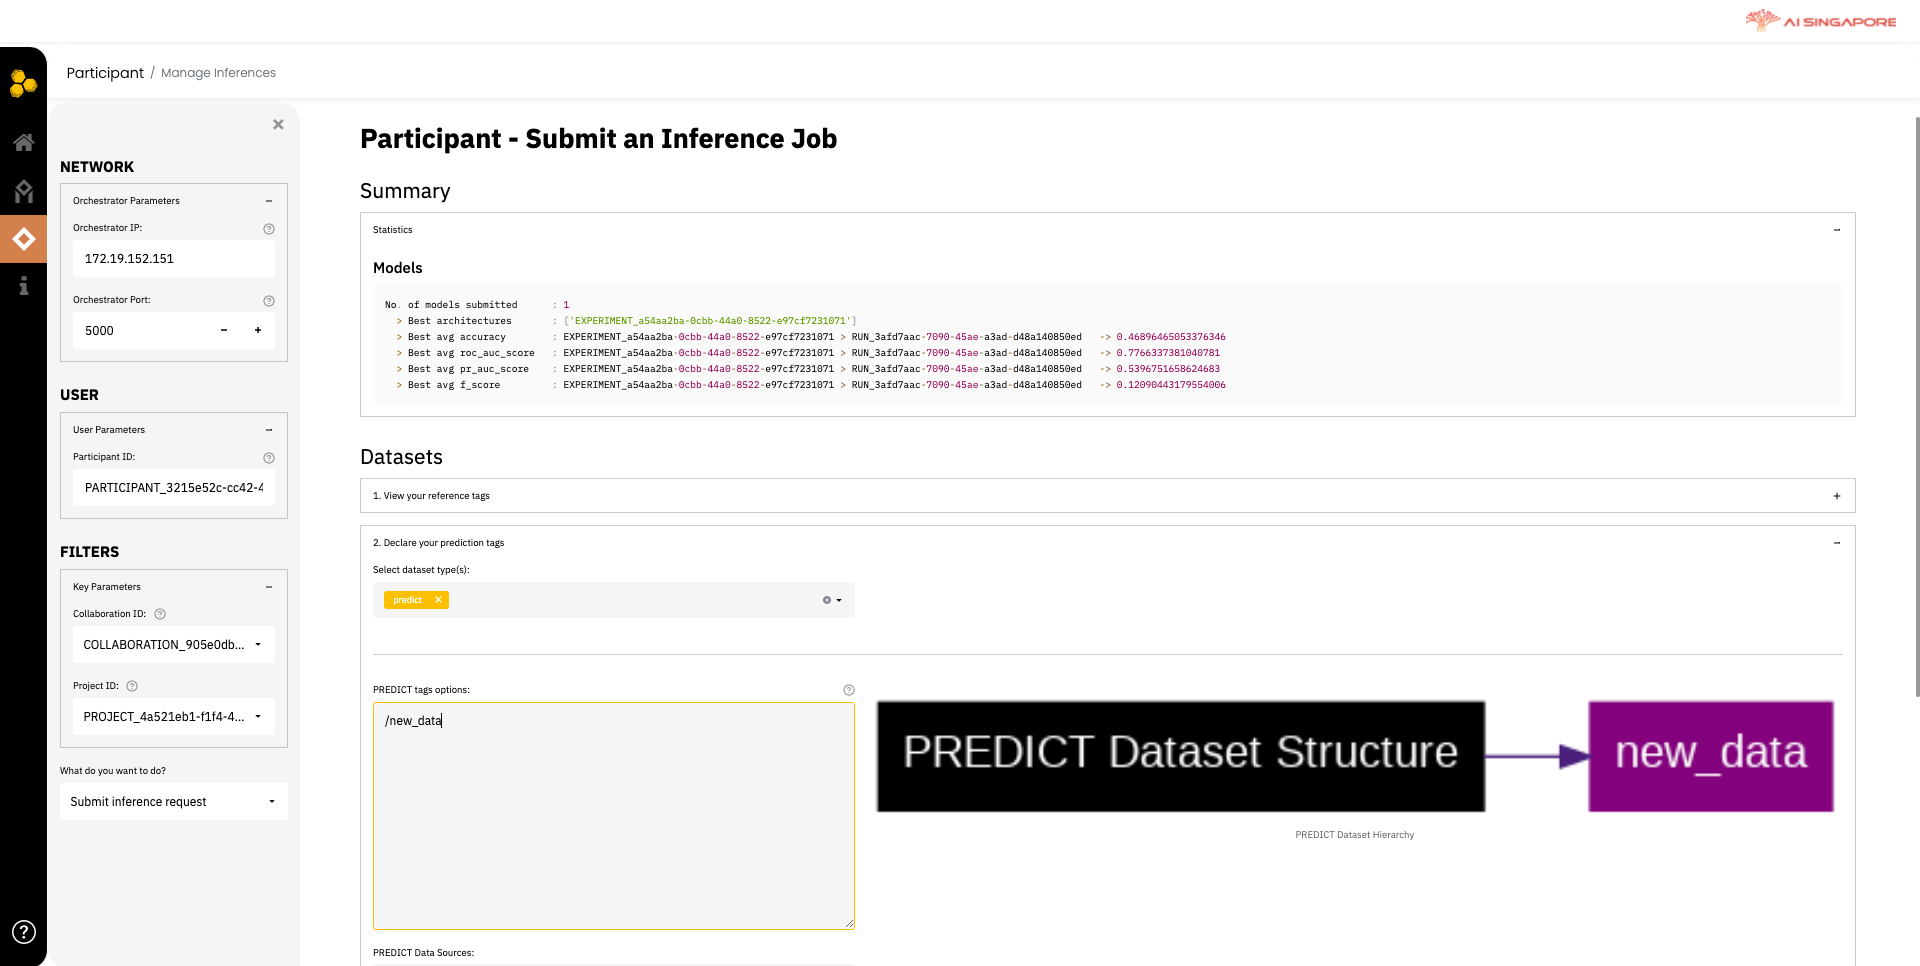
After training is completed, you may use the trained model to predict or evaluate on a fresh dataset. In the Participant Dashboard, click on Predict. This will direct you to the Inference Actions page as shown below.
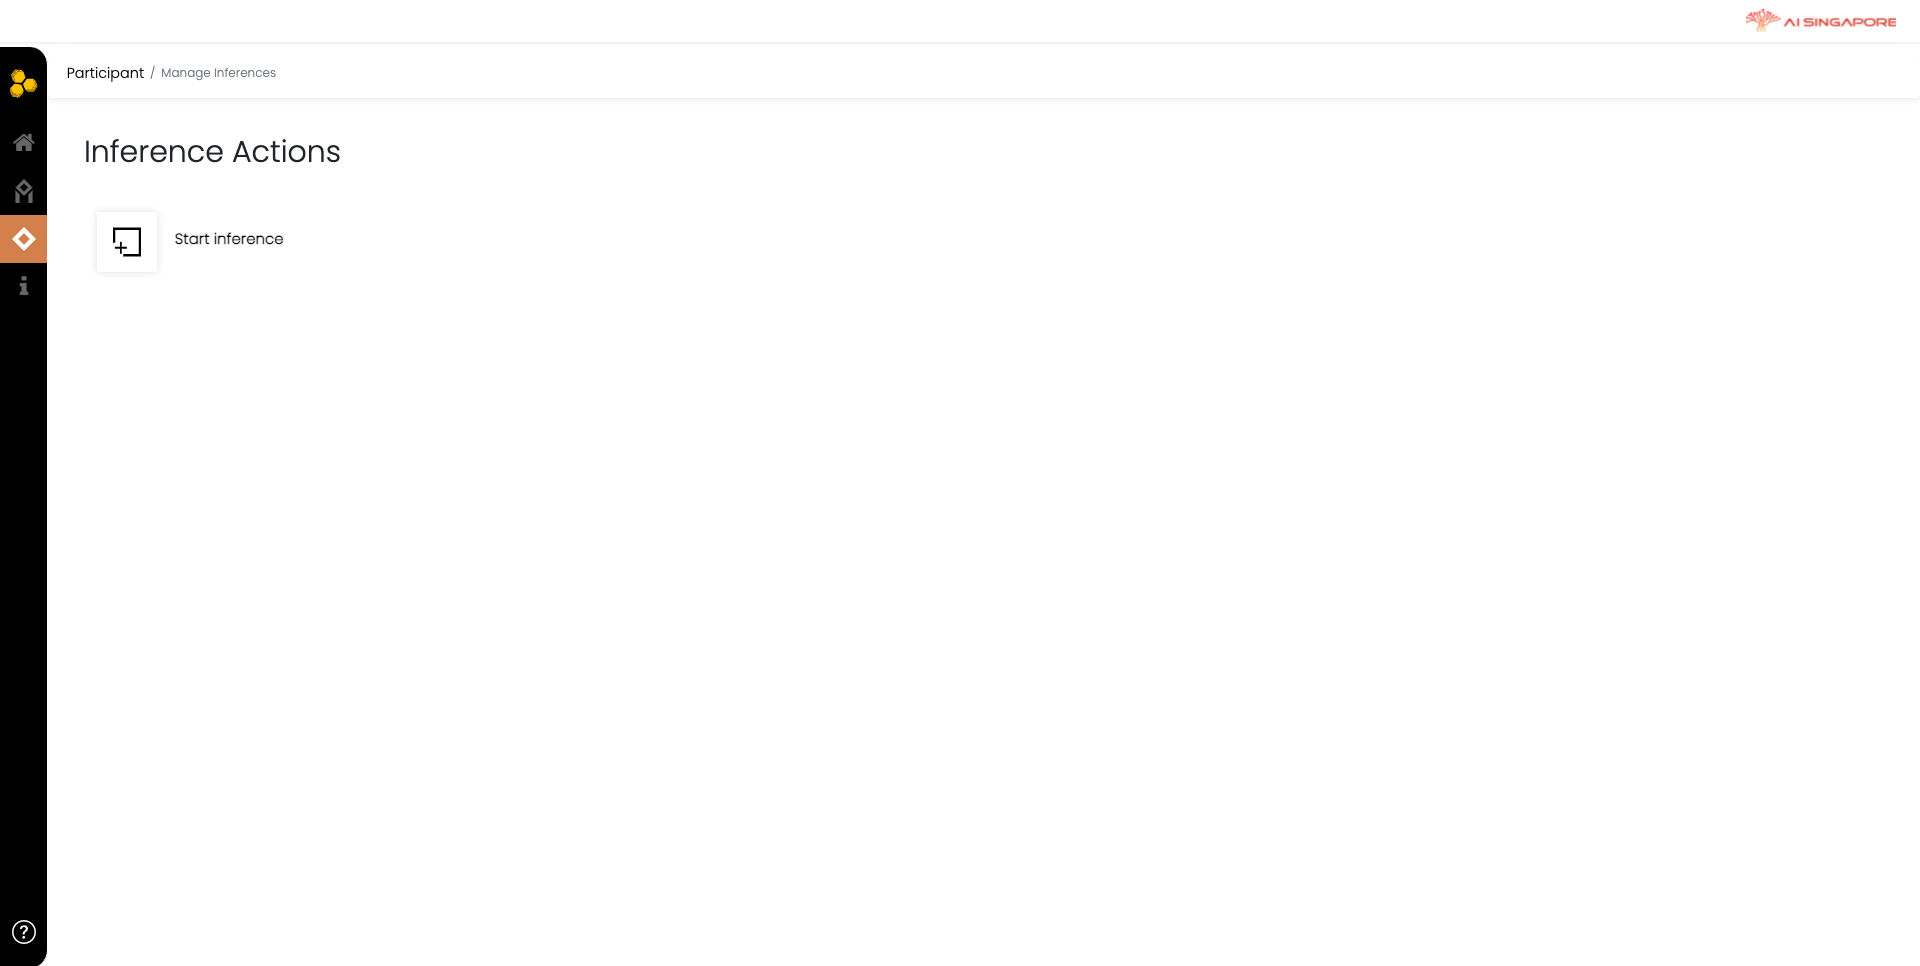
Click on Start Inference to create a profile for yourself, as the participant. This directs you the Manage Inferences page, as shown below.
In the left panel, fill the Participant ID which you want to run inference on. Select the collaboration and project and experiment previously created in 1A, 1B and 1C respectively from the Collaboration ID and Project ID drop-down lists. Next, select Submit Inference Request from the drop-down menu What do you want to do?.
In the right panel, under Datasets, declare your prediction tags for the fresh dataset that you want to run inference.
Once completed, you can proceed to the next step of configurations and starting inference, as shown below.
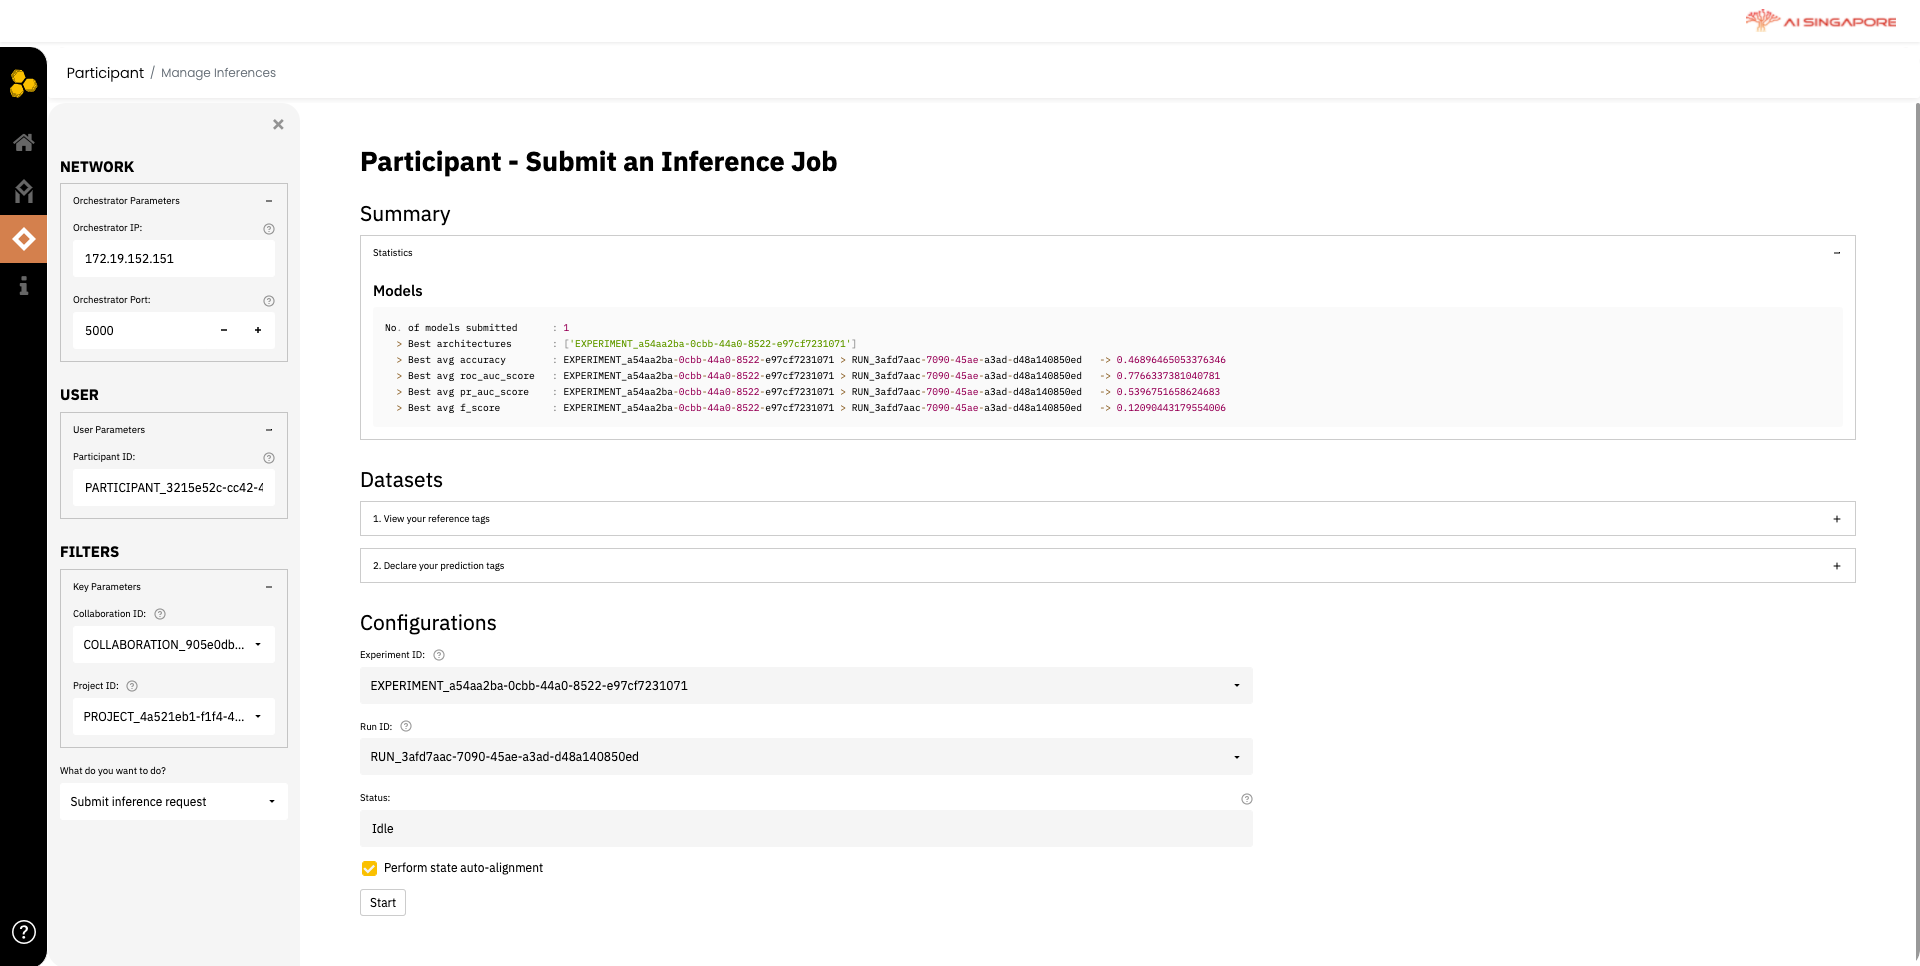
Under Configurations, select the Experiment ID for the model architecture, and Run ID for the respective hyper-parameter set which you want to use for inference. Once ready, you can click on Start button to begin inference.
Once the inference process has completed, the options to either Preview Results or Download Results will appear in place of the Start button on the same page.